 COMP2511
🍎 MacOS SetupPublic
Setting up your local development environment for Java on MacOS.
Warning
- This guide is for local setup. If you are working on CSE, you do not need to follow this.**
- It is recommended to setup development locally in-case you need to use it.**
1. Prerequisites
- Git
zshas your terminal shell- Ensure that your Visual Studio Code is installed in the
Applicationsdirectory.
1.1. Setting Up Prerequisites - Git
Check you have Git installed by running the following command.
git --versionThe expected output if it is installed should be similar to: (note that it doesn't need to identically match what is below, as long as you can see a version, it should be OK).
git version 2.39.3 (Apple Git-145)If Git is not currently installed, you may get a pop-up asking you to install "command line developer tools". Follow the prompts in the pop-up to install Git.
Alternatively, you can run xcode-select --install in your terminal to install Git if the pop-up does not appear.
Tip
1.2. Setting Up Prerequisites - zsh
Check you are using zsh as your terminal shell. This is now the preferred terminal shell for MacOS.
You can check which shell you are running currently by running the following command:
echo $0If the output includes zsh, then you can skip the rest of this section.
If your output includes bash, then run the following command to set your shell to zsh
chsh -s /bin/zshTip
You can run the 1st command again to check if you are now using a zsh shell.
1.3. Setting Up Prerequisites - Visual Studio Code (VSCode)
Warning
Ensure that you have installed your Visual Studio Code application within the Applications folder.
If VSCode is not installed within the Applications folder, it may affect its ability to update and run the Java Extensions.
2. Installing Java JDK 17 On Your Machine
Warning
It is important that you install exactly Java JDK version 17.x on your machine.
This is how we will be compiling and testing your code.
Ensure that you do not have younger or older versions of Java JDK on your machine. If you do, you will need to uninstall or setup your paths correctly.
You can check if you have a previous version of Java installed by opening a terminal and running the following command:
java --versionThere are two main methods of installing Java JDK 17:
- Adoptium
- Homebrew
Follow the guide that best suites you.
2.1. Adoptium Method (Easier: Least amount of configuration)
Warning
It is important that you install the correct version of Java and architecture for your Mac.
Navigate to Latest Releases | Adoptium in your browser, and download and install the appropriate version of Java (see below).
- If you are using an ARM based Mac (M1 or M2), select the
aarch64architecture and download the respective.pkgfile. - If you are using an Intel based Mac, select the
x64architecture and download the respective.pkgfile.
Tip
JDK version, not JRE.Now open the .pkg file you downloaded and follow the prompts to install Java.
You can verify the installation succeeded by checking the version using the command:
java --versionThe output should look like the following (doesn't need to be identical. Most importantly needs to show Java 17)
openjdk 17.0.9 2023-10-17
OpenJDK Runtime Environment Temurin-17.0.9+9 (build 17.0.9+9)
OpenJDK 64-Bit Server VM Temurin-17.0.9+9 (build 17.0.9+9, mixed mode)
2.2. Homebrew Method
Danger
This section of the guide is mainly for those who have used Homebrew before. It is not necessary to install Java 17 using this method.
- Install Homebrew by following the install commands listed here.
Info
- Ensure you don't cancel the installation once started as it may corrupt your install.
- If for some reason it was cancelled and attempting to install is erroring, you may need to look up a guide on how to do a completely fresh install.
- Follow the next steps at the end of the installation.
The next steps may look like (see red box). You will need to copy those commands and run them in the terminal.

- Verify you have brew installed by running
brew --version. This should display Homebrew's installed version. - Install Java 17 using brew by running
brew install openjdk@17(openjdk@17) - Copy and run the command at the end of the installation (see red box).
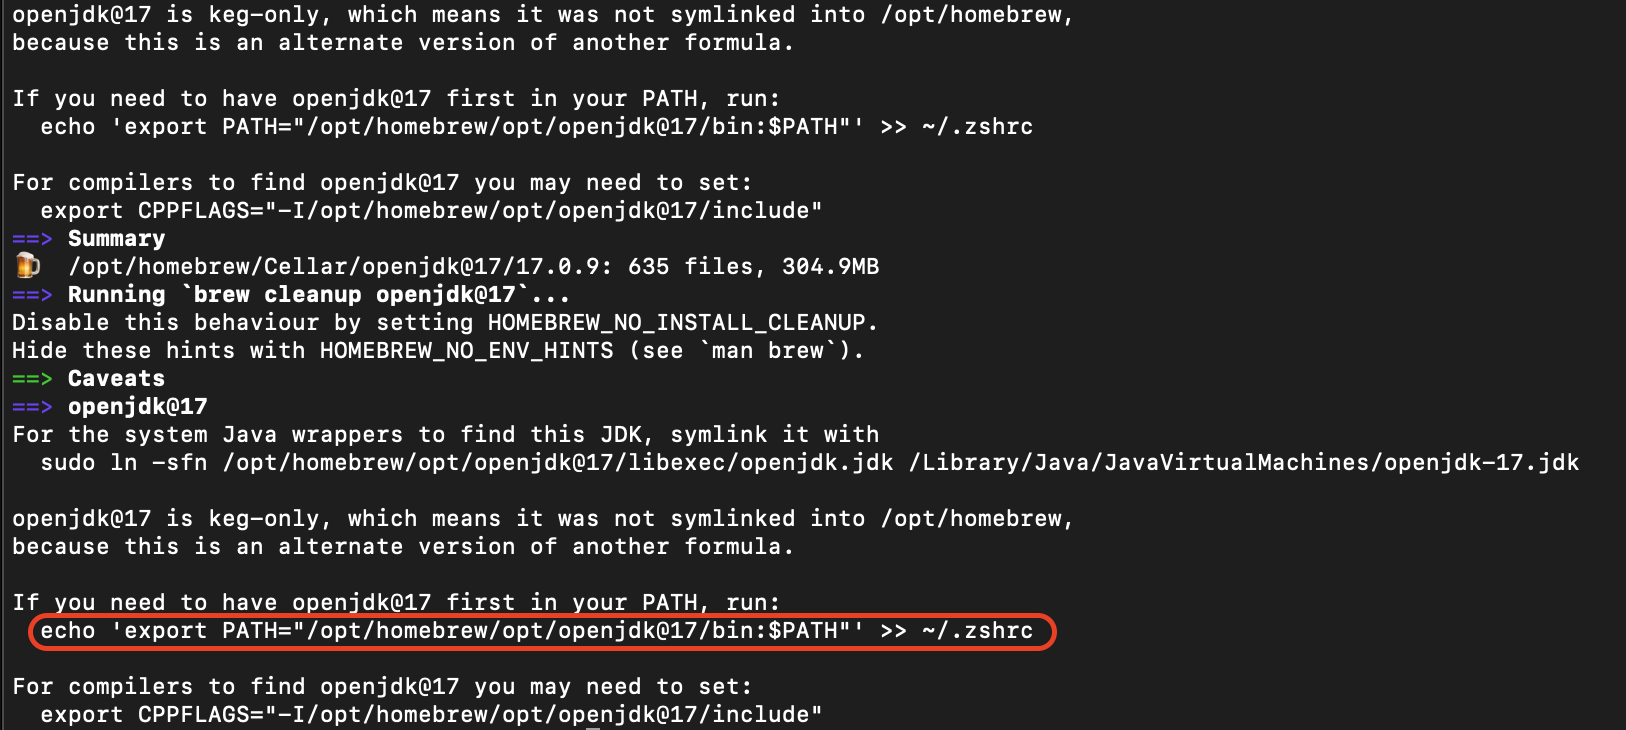
It is important that you run the command highlighted in the red box, or your terminal won't be able to detect your Java installation.
This command will append a line in your ~/.zshrc file which is used by the zsh terminal. If you are using bash, you would want to change ~/.zshrc to ~/.bashrc
- Reload your terminal configuration by running
source ~/.zshrc. This will apply any changes made to the~/.zshrcfile in step 5. - Verify installation by running
java --version.
The output should look like the following (doesn't need to be identical. Most importantly needs to show Java 17).
openjdk 17.0.9 2023-10-17
OpenJDK Runtime Environment Homebrew (build 17.0.9+0)
OpenJDK 64-Bit Server VM Homebrew (build 17.0.9+0, mixed mode, sharing)
3. Gradle 8.8 Installation
Warning
It is important you install exactly Gradle 8.8.
Danger
Do not use Homebrew to install Gradle. COMP2511 uses a very specific version of Gradle.
- Download the Gradle zip file from here.
If you are using Safari, you will need to turn off automatic file unzipping. See How to stop Safari from unzipping files after download.
- Check the zip file is in your downloads folder.
cd ~/Downloads
ls -la
If this is the first time your terminal is reading from your Downloads folder, you may get the following popup.
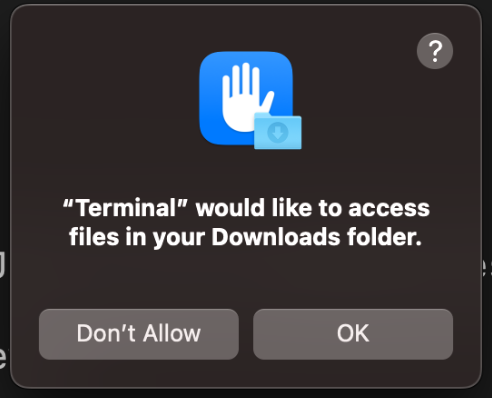
Click "OK" to allow the terminal to view the files inside your Downloads folder.
If you get the following output, you will need to configure permissions manually such that the terminal can read from your Downloads folder.
total 0
ls: .: Operation not permitted
Go to System Settings → Privacy & Security → Full Disk Access, add the Terminal application using the '+' button and allow it full disk access.
You can find the
Terminalapplication by going to theApplicationfolder and looking inside theUtilitiesfolder.
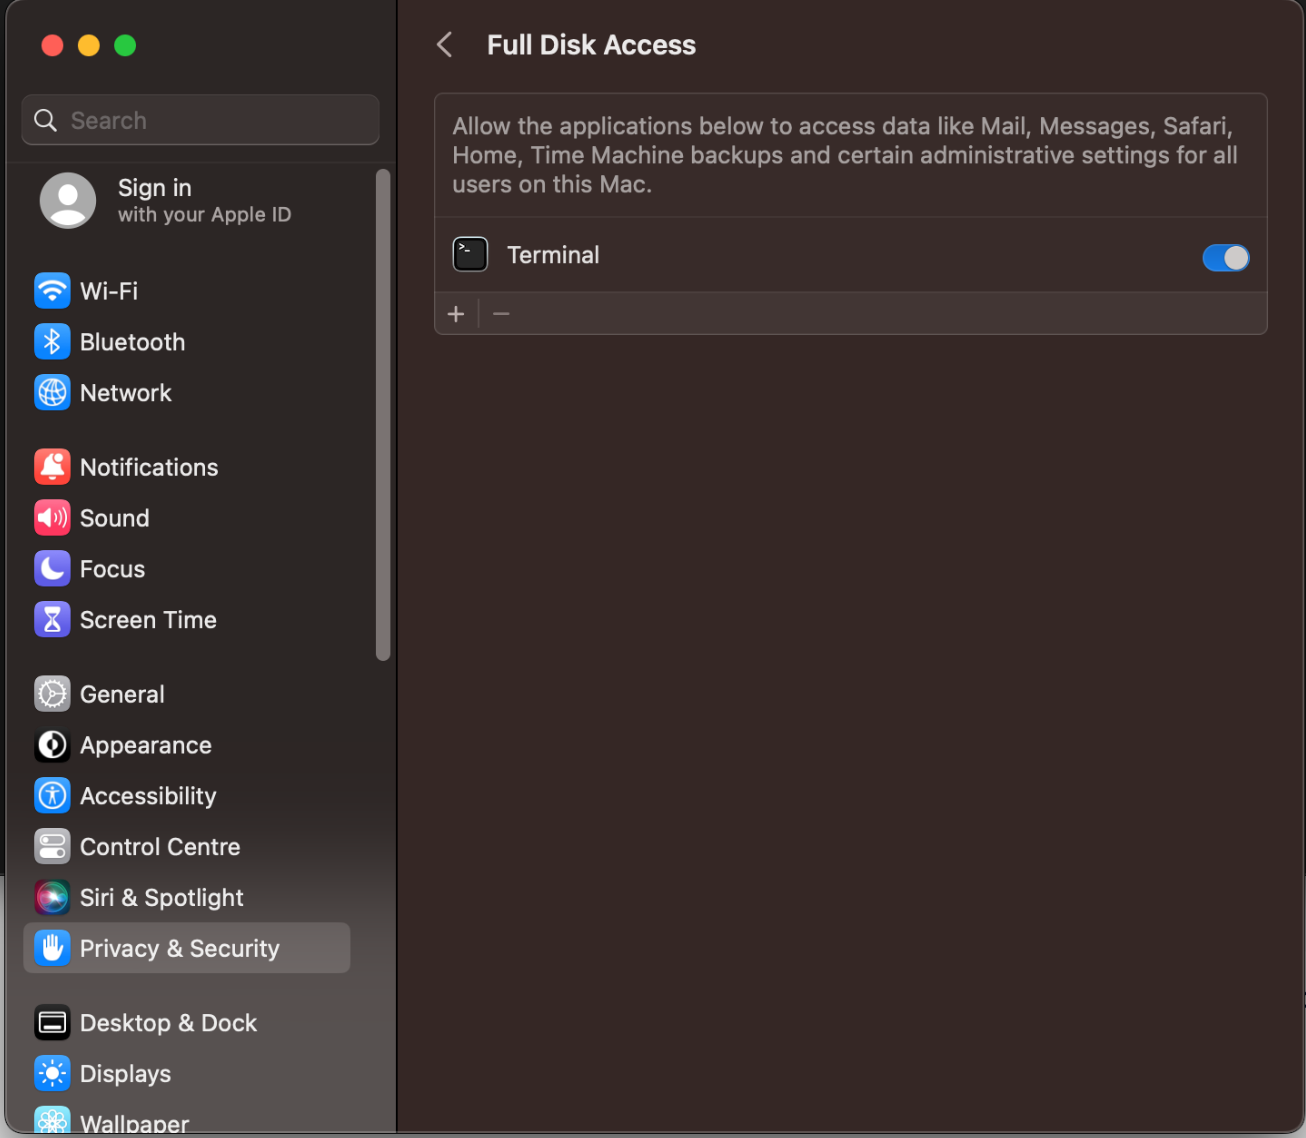
After reopening your terminal, ls -la should be able to display all the files within ~/Downloads.
A file called gradle-8.8-bin.zip should exist in the output.
- Run
sudo mkdir -p /opt/gradle.
Tip
- Run
sudo unzip -d /opt/gradle gradle-8.8-bin.zip.
Tip
You may need to enter in your computer's password.
This command is also assuming that you're in the directory where the gradle-8.8-bin.zip file exists.
- Check Gradle was successfully unzipped by running
ls /opt/gradle/gradle-8.8.
The following output should be expected:
LICENSE NOTICE README bin init.d lib- Now we need to add this Gradle installation to our path so we can use it in our terminal:
printf '\nexport PATH="$PATH:/opt/gradle/gradle-8.8/bin"\n' >> ~/.zshrcInfo
This command assumes that you are using the bash shell. If you are using zsh, replace ~/.bashrc with ~/.zshrc. For other shells, you will have to look this up yourself.
- Reload your terminal configuration by running
source ~/.zshrc. This will apply any changes made to the~/.zshrcfile in step 6. - Verify installation by running
gradle --version.
The following output is expected:
------------------------------------------------------------
Gradle 8.8
------------------------------------------------------------

Build time:   2024-05-31 21:46:56 UTC
Revision:     4bd1b3d3fc3f31db5a26eecb416a165b8cc36082

Kotlin:       1.9.22
Groovy:       3.0.21
Ant:          Apache Ant(TM) version 1.10.13 compiled on January 4 2023
JVM:          17.0.11 (Homebrew 17.0.11+0)
OS:           Mac OS X 14.5 aarch64
The most important things to note are Gradle 8.8 and JVM: 17.x.y.
Last updated on