Week 05 Laboratory Exercises
Objectives
- Practising manipulating files with Shell
- Exploring code useful for assignment 1
- Practice using the Git CLI.
- Practice using the GitLab GUI.
- Getting familiar with managing remote Git repositories
Preparation
Before the lab you should re-read the relevant lecture slides and their accompanying examples.
Getting Started
lab05 and changing to this directory.
mkdir lab05
cd lab05
There are no provided files for this lab.
Exercise:
Backing Up a File
Your program should create a backup copy of this file.
If the file is named example.txt the backup should be called .example.txt.0 but you should not overwrite any previous backup copies.
So if .example.txt.0 exists, the backup copy should be called .example.txt.1 and if .example.txt.1 also exists it should be called .example.txt.2 and so on.
For example:
seq 1 3 > n.txt
cat n.txt
1
2
3
./backup.sh n.txt
Backup of 'n.txt' saved as '.n.txt.0'
cat .n.txt.0
1
2
3
./backup.sh n.txt
Backup of 'n.txt' saved as '.n.txt.1'
./backup.sh n.txt
Backup of 'n.txt' saved as '.n.txt.2'
./backup.sh n.txt
Backup of 'n.txt' saved as '.n.txt.3'
ls .n.txt.*
.n.txt.0
.n.txt.1
.n.txt.2
.n.txt.3
When you think your program is working,
you can use autotest
to run some simple automated tests:
2041 autotest shell_backup
When you are finished working on this exercise,
you must
submit your work by running give:
give cs2041 lab05_shell_backup backup.sh
before Monday 25 March 12:00 (midday) (2024-03-25 12:00:00) to obtain the marks for this lab exercise.
Exercise:
Shell Programs to Back Up a Directory
snapshot-save.sh
snapshot-save.sh should save copies of all files in the current directory.snapshot-save.sh should first create a directory named .snapshot.0 to store the backup copies of the files.
But if .snapshot.0 already exists, the backup directory should be called .snapshot.1 and if .snapshot.1 also exists it should be called .snapshot.2 and so on.
snapshot-save.sh should ignore files with names starting with .
snapshot-save.sh should also ignore itself and snapshot-load.sh (not backup snapshot-save.sh and snapshot-load.sh).
snapshot-load.sh n
When snapshot-load.sh is called with a first argument of n it should restore (copy back) the files from snapshot .snapshot.n.Before doing this it should copy the current version of all files in a new .snapshot directory, (using snapshot-save.sh)
This is to make sure the user doesn't accidentally lose some work when restoring files. It is always done even if the user wouldn't lose work.
Examples
ls .snapshot.*/*
ls: cannot access '.snapshot.*/*': No such file or directory
echo hello > a.txt
./snapshot-save.sh
Creating snapshot 0
ls .snapshot.*/*
.snapshot.0/a.txt
echo word > a.txt
./snapshot-load.sh 0
Creating snapshot 1
Restoring snapshot 0
ls .snapshot.*/*
.snapshot.0/a.txt
.snapshot.1/a.txt
cat a.txt
hello
and
echo hello0 > a.txt
echo world0 > b.txt
./snapshot-save.sh
Creating snapshot 0
echo hello1 > a.txt
echo world1 > b.txt
./snapshot-save.sh
Creating snapshot 1
echo hello2 > a.txt
echo world2 > b.txt
ls .snapshot.*/*
.snapshot.0/a.txt
.snapshot.0/b.txt
.snapshot.1/a.txt
.snapshot.1/b.txt
./snapshot-load.sh 0
Creating snapshot 2
Restoring snapshot 0
grep . ?.txt
a.txt:hello0
b.txt:world0
./snapshot-load.sh 1
Creating snapshot 3
Restoring snapshot 1
grep . ?.txt
a.txt:hello1
b.txt:world1
./snapshot-load.sh 2
Creating snapshot 4
Restoring snapshot 2
grep . ?.txt
a.txt:hello2
b.txt:world2
./snapshot-load.sh 0
Creating snapshot 5
Restoring snapshot 0
grep . ?.txt
a.txt:hello0
b.txt:world0
ls .snapshot.*/*
.snapshot.0/a.txt
.snapshot.0/b.txt
.snapshot.1/a.txt
.snapshot.1/b.txt
.snapshot.2/a.txt
.snapshot.2/b.txt
.snapshot.3/a.txt
.snapshot.3/b.txt
.snapshot.4/a.txt
.snapshot.4/b.txt
.snapshot.5/a.txt
.snapshot.5/b.txt
When you think your program is working,
you can use autotest
to run some simple automated tests:
2041 autotest shell_snapshot
When you are finished working on this exercise,
you must
submit your work by running give:
give cs2041 lab05_shell_snapshot snapshot-save.sh snapshot-load.sh
before Monday 25 March 12:00 (midday) (2024-03-25 12:00:00) to obtain the marks for this lab exercise.
Exercise:
Creating a new Git repository
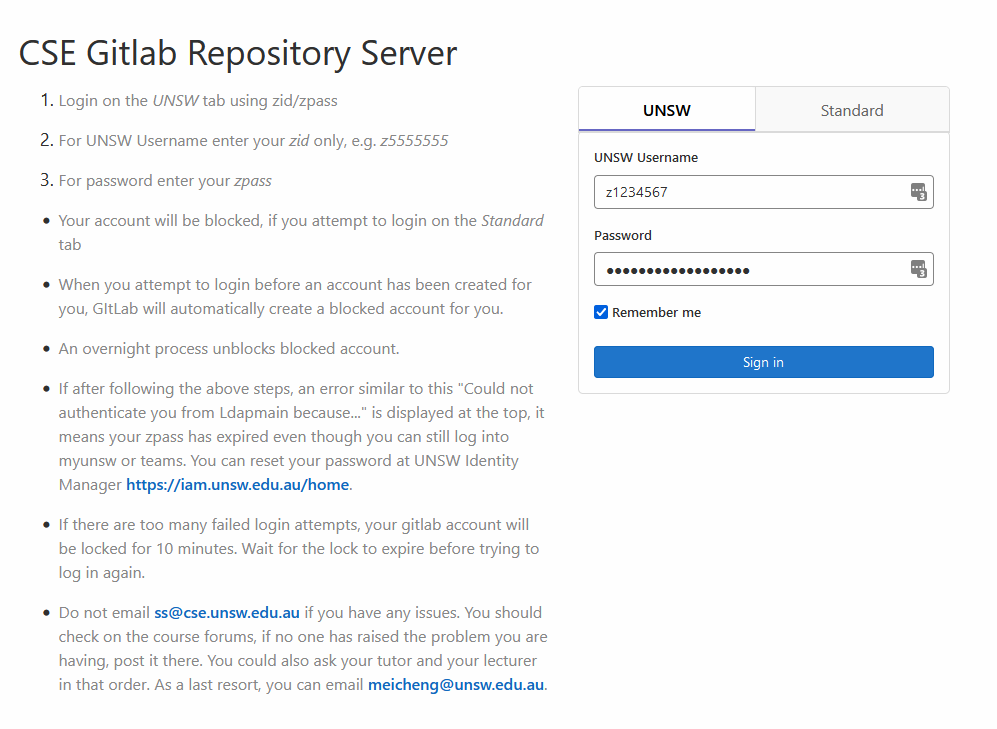
Before you can continue, you will need to create your CSE Gitlab account.
You can do this by visiting: https://nw-syd-gitlab.cseunsw.tech/, and signing in with your zID and zPass.
Make sure you have the "UNSW" tab selected, not the "Standard" tab.
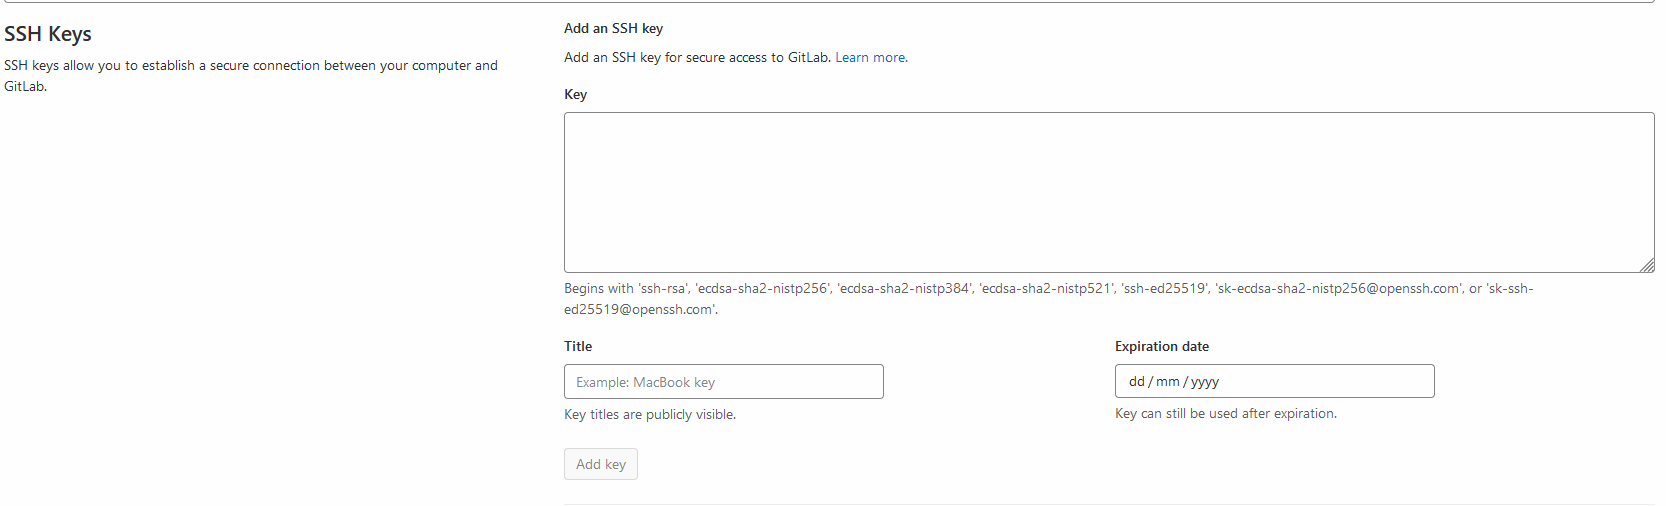
Once logged in, you will need to link an SSH key to your account, in order to have permission to pull / push code in Gitlab.
To link an SSH key, visit: https://nw-syd-gitlab.cseunsw.tech/-/profile/keys.
If you have any problems with this, please ask a tutor or make a post on the course forum.
To start working on a new project, you'll first have to create a new remote Git repository.
To create a new repository go to the GitLab dashboard.
You should find a blue New project button in the upper right-hand corner, where you can create your new repository!
Choose the option to create a blank project.
Choose a name for your project, and set the visibility level to private.
Make sure that the "Initialize repository with a README" option is unchecked.
We will be manually adding a README file in a later exercise.
Once you're done, hit the Create project button, and have a look around your new Git repository!
Take note of the URL used to access your project -- you will need to pass this to 2041 autotest.
Now that you have a GitLab project, we can add files to it.
On your local machine, create a new git repository
git init <repository name>
cd <repository name>
The git repository name doesn't have to be the same as the GitLab project name
But it's generally a good idea to keep them similar
Link your local git repository to your remote GitLab project.
(Look for the blue "Clone" button on GitLab, to get your SSH URL.)
git remote add origin <SSH URL>
Now you can add some files
echo "Hello Git" > my_first_git_file.txt
Next: add, commit, and push your files
Check back on GitLab to see if your files have appeared.
(You might have to refresh the page)
You can now run autotest to make sure everything has worked correctly.
When you think your program is working,
you can use autotest
to run some simple automated tests:
2041 autotest gitlab_new_repo
When you are finished working on this exercise,
you must
submit your work by running give:
give cs2041 lab05_gitlab_new_repo gitlab_new_repo.c
before Monday 25 March 12:00 (midday) (2024-03-25 12:00:00) to obtain the marks for this lab exercise.
Exercise:
Creating a new Gitlab issue
Now we will create an issue to track your progress.
Programming to solve issues is a very common practice in industry, and is something you will likely need to do after you leave UNSW.
To create an issue, you must navigate to your GitLab repository you created in the previous exercise,
Enter the Issues section on the left sidebar.
You will then find a New issue button to get started.
Your first task will be to give your issue an appropriate title.
In this Gitlab project, you're going to write a program that is completely up to you!
Decide on a simple task for yourself to implement in Shell.
Once you've decided on a task,
make the title of your issue reflect the fact that you are going to implement this task,
and describe your task and what you want to accompish in the description section.
Assign the task to yourself,
modify any other options as you would like,
(Like GitLab Milestone and Labels)
and finally create the issue.
Back on your local machine, implement the simple shell script you've decided on.
Once you've implemented the task, add, commit, and push your code.
Return to GitLab and check your file has appeared.
Once your file is on GitLab, return to your issue and close it.
Optionally, you can add a comment to your issue.
You can now run autotest to make sure everything has worked correctly.
When you think your program is working,
you can use autotest
to run some simple automated tests:
2041 autotest gitlab_create_issue
When you are finished working on this exercise,
you must
submit your work by running give:
give cs2041 lab05_gitlab_create_issue gitlab_create_issue.c
before Monday 25 March 12:00 (midday) (2024-03-25 12:00:00) to obtain the marks for this lab exercise.
Exercise:
Creating a new Git Branch
Pushing Code directly to the default branch of a remote repository is generally considered a bad idea.
The default branch is the first branch that anyone looking at your repository will see, and the code that will be cloned.
You should always try to keep the code on the default branch clean, commented, tested, and functional.
When developing a new feature, you should always create a new branch.
Once the new feature is complete, you can then merge it into the default branch.
In your local repository create a new branch with git branch <branch-name>.
Then checkout the new branch with git checkout <branch-name>
You can also use git checkout -b <branch-name> to do both steps at once.
Now that you are on your new branch, you can start working on your new feature.
This feature can be whatever you want it to be.
You can create a new file, modify an existing file, or both!
Once your new feature is complete you should add, commit, and push.
When you push, git will ask you to link your local branch to the remote repository.
Simply copy the command provided by git.
Back on GitLab, nothing should look like it has changed.
Becase you are viewing the default branch, and your frature was added to a different branch.
Near the top left of the page you can find the meanu to swap branches.
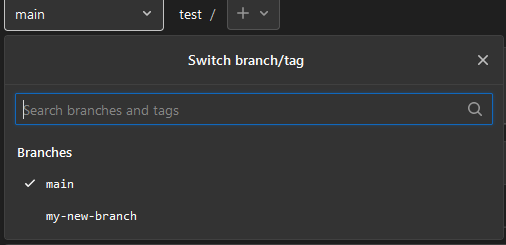
Select your new branch and you will see your new feature.
All that is left is to merge your feature into the default branch.
This can be done on the command line with git merge
But GitLab an another option, a Merge Request
To create an merge request, you must navigate to your GitLab repository you created in the previous exercise,
Enter the Merge requests section on the left sidebar.
You will then find a New merge request button to get started.
Select your feature branch as the Source branch, and your default branch as the Target branch
Now click the Compare branches and continue button.
Similar to the issue we previously created, make the title of your merge request reflect the feature you have implemented,
and describe your task and what you have accompished in the description section.
Assign the merge request to yourself,
modify any other options as you would like,
(Like GitLab Milestone and Labels)
and finally create the merge request.
Once the merge request is created, you can optionally approve it.
Once you are happy with the merge request, you can merge it into your default branch.
Optionally, you can add a comment to your merge request.
You can now run autotest to make sure everything has worked correctly.
When you think your program is working,
you can use autotest
to run some simple automated tests:
2041 autotest gitlab_new_branch
When you are finished working on this exercise,
you must
submit your work by running give:
give cs2041 lab05_gitlab_new_branch gitlab_new_branch.c
before Monday 25 March 12:00 (midday) (2024-03-25 12:00:00) to obtain the marks for this lab exercise.
Exercise:
Documenting your Gitlab repository
You now have made a successful Gitlab project, with your own code!
However, other members of the open source community may want to read some documentation before diving into your project.
Learn how to use markdown to document your project
(eg. https://www.markdowntutorial.com/ -- approx. 10 minute tutorial).
(and Optionally GitLabs Markdown documentation for more advanced features).
Create a file README.md in the root directory of your project,
with overall documentation about the project, including at least:
- A title for your project
- The authors of the project (currently just you)
- What your project aims to do
- Which programming languages and tools it uses, and corresponding URLs to their documentation
You should use at least these markdown features:
- A heading
- Bolded text
- Italicised text
- A markdown link (see: https://www.markdownguide.org/basic-syntax/#links)
Create an INSTALL.md in the root directory of your project.
Explaining to a completely new user how they can install / run the project.
This should include how they can clone your Git repository, and execute any commands necessary to run your project.
It must be formatted in Markdown, but does not have any requirements on features that you must use.
Now that your project is all set up, it's time to choose an open-source license.
Open-source licenses allow you to dictate how the broader community is allowed to use your code, and restrictions on what can and can't be done with it.
Each license has different permissions, conditions, and limitations - so be sure to understand the implications on your project before selecting one.
Visit the website https://choosealicense.com/licenses/, and choose an open-source license for your project to use.
There are no correct or incorrect licenses, so feel free to choose whichever one you believe is best for your project. For a full list of the most popular open-source licenses,
Once you have decided on a license, copy the contents of the license text, and paste it into a new file in your project called LICENSE.
This will make it clear to other developers how your project is licensed.
Now that you have your three files README.md, INSTALL.md, and LICENSE.
add, commit, and push the files.
Optionally you can also add other common files like CONTRIBUTING.md and CHANGELOG to your project.
You can now run autotest to make sure everything has worked correctly.
When you think your program is working,
you can use autotest
to run some simple automated tests:
2041 autotest gitlab_document_code
When you are finished working on this exercise,
you must
submit your work by running give:
give cs2041 lab05_gitlab_document_code gitlab_document_code.c
before Monday 25 March 12:00 (midday) (2024-03-25 12:00:00) to obtain the marks for this lab exercise.
Submission
give.
You can run give multiple times.
Only your last submission will be marked.
Don't submit any exercises you haven't attempted.
If you are working at home, you may find it more convenient to upload your work via give's web interface.
Remember you have until Week 7 Monday 12:00:00 (midday) to submit your work.
You cannot obtain marks by e-mailing your code to tutors or lecturers.
You check the files you have submitted here.
Automarking will be run by the lecturer several days after the submission deadline,
using test cases different to those autotest runs for you.
(Hint: do your own testing as well as running autotest.)
After automarking is run by the lecturer you can view your results here. The resulting mark will also be available via give's web interface.
Lab Marks
When all components of a lab are automarked you should be able to view the the marks via give's web interface or by running this command on a CSE machine:
2041 classrun -sturec