Week 01 Laboratory Exercises
Objectives
In this Lab, you will:
- Learn how to access your CSE account
- Become familiar with the Linux environment
- Use a text editor to create small C programs
- Use dcc to compile a C program
- Run a C program in a Linux terminal
Activities To Be Completed
The following is a list of all the activities available to complete this week...
Problem sets are capped at 15 marks (there are 4 possible bonus marks from the three-dot exercises that can bring you up to a total of 15 if you missed out on any other marks in the one- or two-dot exercises).
Completing just the one and two-dot exercises every week can give you the full 15 marks needed in this component.
For more details, see the course outline.
Setting Up Your Own Computer to Work on DPST1091
If you are having problems setting up your own computer, we will be able to help you during the lab time, or feel free to ask on the course forum..
Try to set up your laptop and/or desktop this week so you can work on DPST1091 at home.
Logging In
This term, you will need to use VLab to connect to CSE. There's more information about how to do that at the Home Computing link.
To log in, you use your zID (which looks something like
z1234567) and your zPass (which is used to log into all other
university online services).
The CSE labs use the Linux operating system (not Windows or OSX or ...).
When you log in, by default, you'll be using the xfce4 window manager, and you'll see a linux desktop.
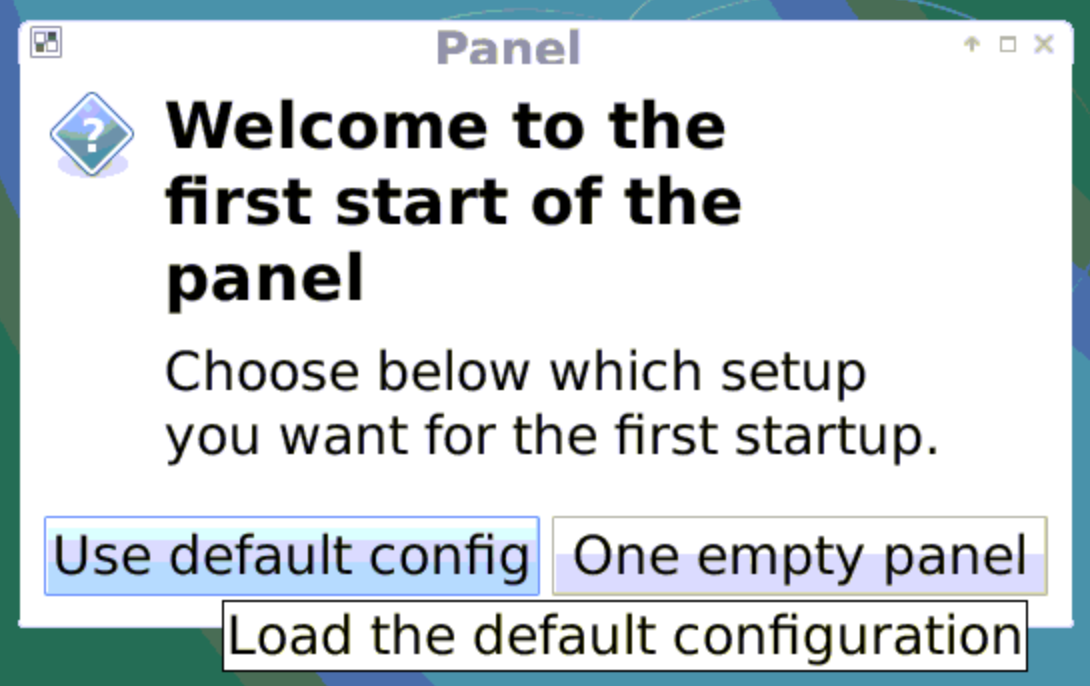
If you are asked to select a panel click on Use default config, as in the image below.
Along with menus that you can see, such as the Applications Menu in the top left corner, it also has a simple menu you can access by right-clicking anywhere on the desktop.
Have a look around and see if you can work out how to open a web browser.
Positioning Windows
To easily move a window on VLAB, hold down the Alt key then click and drag with your Left Mouse button anywhere on the window itself.
You can also resize the window by using the same method but with your Right Mouse instead of your Left Mouse button.
Try to move and position windows in this way. It is faster and easier than seeking the edge of the window.
Also notice in top VLAB menu near the clock, there is support for multiple "workspaces" which simulate multiple screens. This is similar to the 4 finger swipe from Apple computers. You can change to a different screen by clicking on its icon near the clock.

Try to put these instructions on one screen, then on another screen open a terminal and gedit, one on each side of the screen.
Commanding the Terminal
There are a few shortcuts you can use which make using a terminal so much easier.
If you ever want to rerun a command which you have run before, when you are typing the command, you can use the UP ARROW key to cycle through previously run commands.
For example if you compile your code, then edit your code, and you want to compile it again, you can just press UP ARROW to retreive your recently executed dcc command, then press Enter to run it again.

Try to use the UP ARROW to reuse your commands. If you go to far, you can use DOWN ARROW to go backwards.
If you are typing command you haven't run before, and one of the words is a file name, you can press the Tab key to trigger automatic completion of that file name.
Copying and Pasting
Copying and pasting text can sometimes be tricky especially if it involves a terminal.
Inside VLAB you can copy text by simply highlighting it by clicking and dragging your mouse over it. There is no need to press Ctrl+C. The text will be automatically remembered once it is selected. To paste the text, click the third mouse button. If you are using a mouse, usually this is pressing down your scroll wheel. If you are using a trackpad on a laptop it might be a 3-finger tap.
Try to practice this technique of quickly and efficiently copying and pasting. It makes it very easy to copy commands into a terminal.
If the above method doesn't work, Ctrl+C and Ctrl+V will work, but when you are using a terminal to copy from or paste to, you will need to use Ctrl+Shift+C and Ctrl+Shift+V.
It is possible to copy and paste text from outside VLAB as well. When you copy or paste outside VLAB, simply use the regular method for your computer.
OPTIONAL: Using the SSH-FS plugin for VS Code
The easiest way to access the CSE servers using VS Code is to use the ‘SSH FS’ plugin.
The ‘Remote-SSH’ plugin can fill up your account and slow down the server, so use this one instead. Please go to this link for more information:
Using the SSH-FS plugin for VS Code.
Exercise 0: Trying out some Linux Commands
Although there are lots of things you can do by using the graphical user interface (GUI) - clicking on menu items and icons, we really want you understand how to use the Linux command-line.
If you get stuck with any of this, don't hesitate to ask one of your tutors for help, that's why they're here!
If there isn't a terminal open, right click on the desktop and select 'Open Terminal Here'
This will bring up a window where you can type in Linux commands.
There are a few commands that you can use to check your account details:
rquotatells you how much of your disk quota you've used up (from creating files)acctells you your name, what classes you're in, where your home directory is and other details that may or may not be useful
Each of these is a command, and when entering into your terminal, you need to press enter (or return) after each command. Try the two we just mentioned above.
Now try running the command date - which prints the current
time and date.
You should see something like this:
date
Monday 26 February  12:15:20 AEDT 2018
Now we're going to learn about some commands for working with directories (directories are often called folders on other operating systems).
- pwd
- ls
- cd
- mkdir
The Linux command pwd tells you what directory you are in,
often called your current working directory.
pwd stands for 'print working
directory'.
If your username is 'z7654321', and you enter the 'pwd' command into the terminal, it might tell you:
pwd
/import/cage/1/z7654321/Desktop
This means that I'm in the Desktop directory inside my (z7654321's) home directoryand my home directory is stored on the file server called cage.
What does pwd print for you?
The Linux command ls prints a list of the files
in the present directory. Since you have a new account there will probably be
nothing in your Desktop directory.
ls
The Linux command cd is a command that you can use to
change your directory.
If you type in cd on its own as follows, you will move into your home directory.
Try this out and confirm your directory has changed by running
pwd again.
pwd
/import/cage/1/z7654321/Desktop
cd
pwd
/import/cage/1/z7654321
If you run ls you'll see what is in your home directory. Since
you have a new account, your home directory will most likely only contain your
Desktop and a directory called public_html (which is where you can create files
to create websites).
ls
Desktop  Documents  Downloads  Music  Pictures  public_html  Videos
The Linux command mkdir makes
a new directory. To use it you must supply the name of the
directory you wish to create. Lets use it to create a directory for this
week's lab exercises.
mkdir lab01
Now the command ls should show you the directory you just
created.
ls
Desktop  lab01  public_html
Now we will use cd in a slightly different way where we tell it
what directory we want to change into.
cd lab01
To confirm we really are in our new created lab01 directory type the
pwd command again.
pwd
/import/cage/1/z7654321/lab01
If all this has worked, it's time to try compiling your first program!
Bonus commands
Here's a list of some additional commands you might want to try out:
touch my_filewill create an empty file, calledmy_file.-
mv my_file other_filewill move (or rename)my_fileto be calledother_file. -
cat my_filewill print out the contents of the filed namedmy_file. - An A-Z index of linux commands
There are also some really useful features that terminals have which will make them much easier to use.
- If you want to edit a command, you cannot use a mouse to select earlier on the line. However, you can use the left and right arrow keys! Then press enter to use the command.
- To repeat a previous command, press the up arrow. This will show you the command you just ran. You can keep using the up arrow key to go further backwards into history.
Exercise 1: Your first program : Bad Pun (●◌◌)
Now it's time to create a file. We are going to use the text editor gedit.
Tip: you can run a command to help set up your CSE account for DPST1091, which will configure gedit and set up some default programs.
In a terminal, type (without the dollar sign):
1091 setup
and press enter.
To create a file using gedit, type:
gedit bad_pun.c &
This will open up a graphical editor where you can manipulate text.
Adding the & to the end of a command allows the GUI to
return control to the terminal as soon as it starts (i.e. run in the
background) rather than after it is closed. If you forget the
&, you will not be able to type commands into the terminal
until the GUI application is finished. This is always a good idea when running
a command which invokes a graphical user interface (GUI).
Here's an example of a simple C program. Copy it into the gedit window, and save it.
// A simple C program that attempts to be punny
// Written 23/2/2017
// by Angela Finlayson (angf@cse.unsw.edu.au)
// for DPST1091 Lab 01 Exercise 1

#include <stdio.h>

int main(void) {

    printf("Hello, it is good to C you!\n");

    return 0;
}
When you save, it will place the contents of the editor into the file
bad_pun.c.
Handy Tip 1: On many linux systems copying can be achieved by simply highlighting with the left mouse button and pasting can be achieved by simply clicking with the middle button.
Handy Tip 2: Make sure gedit is displaying line numbers down the left hand side. This is important for when we need to fix compile time errors.
The easiest way to set this up is by running 1091 setup in your
terminal.
You can also change whether line numbers are displayed by going to the Edit->Preferences menu item and selecting the 'Display Line Numbers' option.
Once you have pressed save, click on the Terminal window again and type this command to compile your program:
dcc -o bad_pun bad_pun.c
The -o bad_pun option tells the compiler to givethe newly
compiled program the name bad_pun.
Test what happens if you leave the -o bad_pun option out. What
is the default name dcc uses?
You may wish to use the rm command to delete
(remove) the file created.
(You can Google rm or rm linux if you are not sure how it works).
If dcc does not print out any error messages, then your program
has been successfully compiled. Otherwise you will need to find the errors in
your code, fix them, save the file and compile again.
Handy Tip 3: Look for the line numbers that are displayed in the error messages as they are major clues to where the problem is in your code.
Handy Tip 4: Always start with fixing the first error first. Sometimes fixing one compile error, saving and recompiling can make all or some of the other errors go away!
After successfully compiling you can check that dcc has produced an
executable by typing ls -l and looking for a newly-created
bad_pun file (check the file creation time to see if it really is
new).
A useful Unix command is man short for manual. Find out what
the -l option for the ls command you used before
does. Type:
man ls
In the manual page you can scroll using your arrow keys on your keyboard. Press 'q' to exit man.
Run the program to test that it works. Type:
Press 'q' to exit man.
Run the program to test that it works. Type:
./bad_pun
The ./ before the program name specifies that the program is
found in the current directory. Note that Unix executable (program) names do
not require the .exe extension that you might have have seen under
Windows.
The DPST1091 class account contains a script that automatically checks your solution to lab exercises.
While it is not important this week, lets run the autotest
script so you can see what it does.
You can check bad_pun.c like this:
1091 autotest bad_pun
Test 0 (./bad_pun) - passed
1 tests passed  0 tests failed
Please ask a tutor if you failed the tests and you don't know why.
You submit your work with the give command like this:
give dp1091 lab01_bad_pun bad_pun.c
Exercise 2: Creating an ASCII Bird (●◌◌)
Tip: you can run a command to help set up your CSE account for DPST1091, which will configure gedit and set up some default programs.
In a terminal, type (without the dollar sign):
1091 setup
and press enter.
Now use the Linux command cp to copy bad_pun.c to
a new file named bird.c, like this:
cp bad_pun.c bird.c
You are now ready to start editing the file bird.c using your
favourite editor.
gedit bird.c &
Note that the basic structure of the program can be retained; you just need
to change the comments, and modify and/or add printf statements to the program.
Edit the file bird.c to produce a new program that behaves as
follows:
dcc -o bird bird.c
./bird
  ___
 ('v')
((___))
 ^   ^
Make sure you save your modified program before you compile it.
Make sure you re-compile your program every time you modify the code.
Handy Tip 5 : Linux remembers the commands we have recently typed in. By pressing the UPARROW key, it will bring up your previous command and save you retyping it in! Try it. You can press the UPARROW key repeatedly to go back to the second last command, third last command and so on.
Handy Tip 6 : At your Linux command prompt, type in ./b
and then press the TAB key. Linux will automatically try to fill in
your partially typed command for you!
Again try the automatic checking script in the class account.
1091 autotest bird
Test 0 (./bird) - passed
1 tests passed  0 tests failed
Please ask a tutor if you failed the tests and you don't know why.
You submit your work with the give command like this:
give dp1091 lab01_bird bird.c
Exercise 3: Fixing errors in bugs.c (●◌◌)
Tip: you can run a command to help set up your CSE account for DPST1091, which will configure gedit and set up some default programs.
In a terminal, type (without the dollar sign):
1091 setup
and press enter.
As programmers, most of our time is often spent finding problems in existing code. This skill is called debugging. The skill of debugging is just as important as creating new code. The next two lab exercises provide you the opportunity to practice debugging.
Copy the program bugs.c from the course account to your
directory by typing (make sure you type the dot at the end):
cp ~dp1091/public_html/24T3/tlb/01/bugs.c .
The dot '.' is a shorthand for the current directory and there is a space
between bugs.c and the next dot. You can check that the file
has been copied by typing:
ls
bad_pun  bad_pun.c  bird  bird.c  bugs.c
You can examine the contents of the file by typing:
less bugs.c
// A program that is filled with bugs
// Angela Finlayson A.Finlayson@unswcollege.edu.au
// 01/01/2019

integer main(viod) {
...
(less is an improved version of an earlier utility called
more, which shows you long text files one page at a time and
allows you to go forward and back using the space bar and the 'B' key. Less is
more! Press 'q' to exit less.)
Now try to compile bugs.c. You should see a list of confusing error messages.
dcc -o bugs bugs.c
bugs.c:5:1: error: unknown type name 'integer'
integer main(viod) {
...
Your job is to fix the errors.
You'll need to use an editor to change the file bugs.c
Run gedit like this:
gedit bugs.c &
When you have fixed all the errors you should be able to do this.
dcc -o bugs bugs.c
./bugs
Stop bugging me!
I mite get really annoyed
Shoo!
Hint: the error messages are confusing but they usually indicate where the problem is.
Hint: treat it as a puzzle. Look for differences between your program and the working programs you have been shown.
Again try the automatic checking script in the class account.
1091 autotest bugs
Test 0 (./bugs) - passed
1 tests passed  0 tests failed
Please ask a tutor if you failed the tests and you don't know why.
Submit your work with the give command like this:
give dp1091 lab01_bugs bugs.c
Exercise 4: Fixing errors in an ASCII Kangaroo (●◌◌)
Copy the program kangaroo.c from the course account to your
directory by typing (make sure you type the dot at the end):
cp ~dp1091/public_html/24T3/tlb/01/kangaroo.c .
You can examine the contents of the file by typing:
less kangaroo.c
// A simple C program that prints an ASCII kangaroo
// Written 7/3/2017
/  by Andrew Taylor (andrewt@unsw.edu.au)
// as a lab example for COMP1511
...
dcc -o kangaroo kangaroo.c
kangaroo.c:4:1: error: expected identifier or ‘(’ before ‘/’ token
 /  by Andrew Taylor (andrewt@cse.unsw.edu.au)
...
Your job is to fix the errors.
You'll need to use an editor to change the file kangaroo.c
Run gedit like this:
gedit kangaroo.c &
When you have fixed all the errors you should be able to do this.
dcc -o kangaroo kangaroo.c
./kangaroo

  /\   ___
 <__\_/    \
    \_  /  _\
      \_\ / \\
        //   \\
      =//     \==
Hint: all the errors but one involve a single missing character.
Hint: if it looks like there are too many backslashes in the program, it is correct. Don't delete any backslashes (you do need to add one backslash). It was mentioned in lectures that the backslash has a special interpretation in C.
Again try the automatic checking script in the class account.
1091 autotest kangaroo
Test 0 (./kangaroo) - passed
1 tests passed  0 tests failed
Please ask a tutor if you failed the tests and you don't know why.
Submit your work with the give command like this:
give dp1091 lab01_kangaroo kangaroo.c
Exercise 5: Fixing Code Style (●◌◌)
In this course we learn how to instruct computers with code, however computers don't actually read the code directly. They read a complicated compressed version of your code which is produced by your compiler, such as dcc. Usually the code we write will be most often read by humans, either yourself in the future or another person.
It is important to write code which is easily readable and understandable by humans. Doing so will make you a more efficient and effective programmer.
Copy the file messy.c for this exercise into your current directory using this command. Make sure to include the dot at the end of the command.
cp ~dp1091/public_html/24T3/tlb/01/messy.c .
In this exercise you have to modify the program messy.c to be easily readable and understandable by humans. There are many important considerations for the style of the code, but some important considerations for now include:
- Header Comment: ensure that at the top of the file, before any code, there are comments which include the author (zid), date, and description.
- One statement per line: ensure that each statement is on it's own line.
- No duplicated code: If parts of your code are repeated, try to think of an alternative layout which removes the duplicated code.
- Comments throughout code: Summarise what the code does with comments.
- Whitespace: newlines and space characters should be used to appropraitely format your code.
There are many other important style considerations. For a more comprehensive set of rules, feel free to browse our style guide.
You can also use the following command to give you automated feedback on style.
1091 style messy.c
The goal is to reduce the amount of time required for a human to understand the code.
For submission, when you have modified the code to have good style, please post it on here along with an introduction and optionally a cute pet pic. There is no need to use the give command like usual.
Remember never to post assessment code on the course forum. Course staff can view your recently autotested/submitted code. You can also post anonymously, by clicking on your profile icon in the top right, then click on your zID, then click on "Enter Anonymous Mode".
Exercise 6: Receiving message from the course on Teams
I have sent a message to our Microsoft Teams group. It is the first message you can see in General channel". You need to reply to it. We want to make sure you can receive messages from Teams!
Exercise 7: [Optional] Message of the Day
A Message of the Day (often called an "MotD") is a message traditionally shown when you log into a unix system. It usually gives you a warm greeting and tells you some information.
In this exercise, you will make your own MotD. You do not need to submit it, nor is it directly assessed in any way. It is, however, an opportunity for you to demonstrate your creative skills to your new friends and tutors. You can even keep adding to it throughout the term.
To get started, run the following command. It will show the following output.
1091 motd
Did not find a MotD! You should make a file called motd.c and compile it.
This program has just enabled an MotD on your shell, but now you need to specify what it will say.
Make a new file called motd.c in your home directory. If you're
not in your home directory, type the command cd to go there.
You should make this program print out a message of the day, like "Hi Tom, I'm looking forward to DPST1091".
When you're done, you can run:
dcc -o motd motd.c
./motd
Hi Tom, I'm looking forward to DPST1091.
To get rid of the message, remove the motd file:
rm motd
Now that you've got it working, here are some ways to make your motd stand out:
- Make some ASCII text: Here's an ASCII text generator!
- Add some ASCII art (a time honored tradition in computing): Here's one collection - google for more!
Submission
give.
You only need to do this if the exercise specifies a give command, otherwise - the exercise is not worth marks.
You can run give multiple times.
Only your last submission will be marked.
Don't submit any exercises you haven't attempted.
If you are working at home, you may find it more convenient to upload your work via give's web interface.
Remember you have until Week 3 Monday 9:00am to submit your work.
You cannot obtain marks by e-mailing your code to tutors or lecturers.
You check the files you have submitted here.
Automarking will be run by the lecturer several days after the submission deadline,
using test cases different to those autotest runs for you.
(Hint: do your own testing as well as running autotest.)
After automarking is run by the lecturer you can view your results here. The resulting mark will also be available via give's web interface.
Lab Marks
When all components of a lab are automarked you should be able to view the the marks via give's web interface or by running this command on a CSE machine:
1091 classrun -sturec
Generative AI Permission Level
In completing this assessment, you are permitted to use standard editing and referencing functions in the software you use to complete your assessment. These functions are described below. You must not use any functions that generate or paraphrase passages of text or other media, whether based on your own work or not.
If your Convenor has concerns that your submission contains passages of AI-generated text or media, you may be asked to account for your work. If you are unable to satisfactorily demonstrate your understanding of your submission, you may be referred to UNSW Conduct & Integrity Office for investigation for academic misconduct and possible penalties.
DPST1091/CPTG1391 Specific Information
You are permitted to use the tools dcc-help to help you understand the error messages you may get when compiling the code you have written.
You are permitted to use autotest-help to help you understand why your code may not be passing the automated tests.
You are not permitted to submit code generated by automatic AI tools such as Github Copilot, ChatGPT, Google Bard in DPST1091/CPTG1391/COMP1511 for assignments. Submitting code generated by Github Copilot, ChatGPT, Google Bard and similar tools will be treated as plagiarism.
Our reasoning behind our decisions:
Systems such as Github Copilot and ChatGPT based on large language models or other generative artificial intelligence techniques, look likely to become heavily used by programmers. However, you need a good understanding of the language you are coding in and the systems involved before you can effectively use these tools. Using these tools to generate code for DPST1091/CPTG1391/COMP1511 instead of writing the code yourself will hinder your learning.