 COMP1531
🚀 Getting Started Public
For COMP1531, you will need NodeJS, Git and VSCode (or another text editor).
We strongly encourage students to try out a local setup for Windows or Mac.
However, using VLAB is also sufficient for this course.
1. VLAB (TigerVNC)
Here is a quick guide to using VLAB. Once you have access to VLAB, open a terminal and type in
1531 setupThen close and re-open the terminal. That's it, you are good to go!
However, we strongly encourage Computer Science and Software Engineering (CSE) students specifically to learn how to set up locally as this will be beneficial to your learning throughout your CSE degree.
2. Local Setup for Windows
Below is a video made by one of our tutors showcasing this process:
2.1. Installing VSCode
First, go and install VSCode for Windows.
2.2. Installing WSL and git
Windows is a very different environment to use the terminal on than Linux based systems (which evolved from UNIX, as opposed to windows which evolved from DOS). Unix based systems are more commonplace in research and industry, so instead of using the windows terminals we encourage you to use the linux terminals inside of Windows. To set this up, we'll be creating a Linux system inside Windows using a tool called Windows Subsystem for Linux (WSL).
Open up Powershell as an administrator, then run the command:
wsl --installYou might need to wait a few minutes for it to complete.
If you get an error saying that "virtualisation is disabled", you may need to change some settings in your BIOS. The specific steps you need to follow depend on your computer, but here are some generic instructions that may help.
Once WSL is installed, restart your computer. Windows may perform a system update as new packages are required.
If a terminal doesn't open within a minute or so...
Manually launch the newly-installed "Ubuntu" app via the Windows Start Menu.
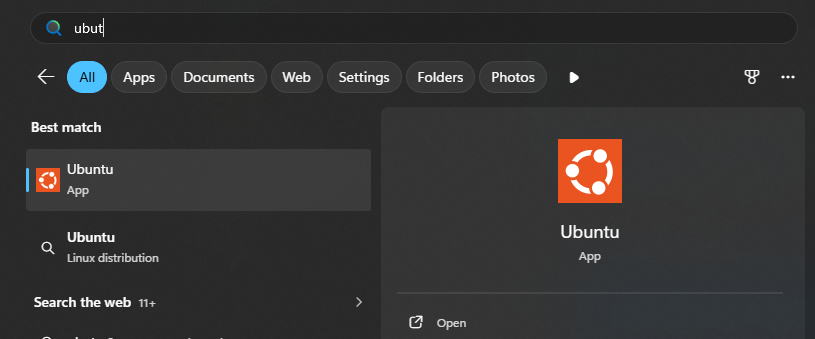
Wait for the installation to finish. For some people, this takes 30 seconds, but for others it can take up to half an hour. Make sure you don't stop the process, or you might need to delete and reinstall WSL.
Once it's finished installing, you'll be prompted to created a username and password.
- Unix usernames should be lowercase without whitespace.
- When entering your new password, it won't be shown on-screen for security reasons.
After confirming your password, you'll be dropped into a new Linux terminal session.
Check this by running:
unameThen update your system, by running the following commands:
sudo apt update
sudo apt upgrade
These commands retrieve and install the latest updates and security fixes for your system. It's recommended to run them every few weeks.
The next thing we need to do is link WSL to VSCode. First, launch VSCode from the Windows start menu.
Then, open the extensions panel, search for, and install the "WSL" extension.
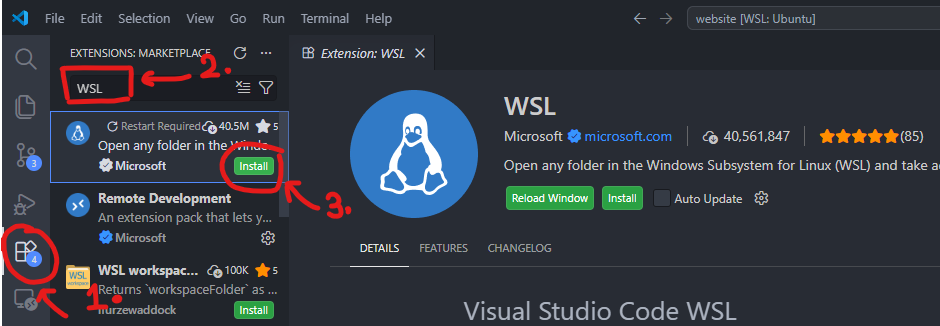
This extension tells VS Code how to communicate with the Windows Subsystem for Linux, which allows you to use VS Code on Windows with the back-end running on Linux.
Once the extension has installed, you should see a “two arrows” button in the bottom-left corner of your VS Code window.
Click it and choose to "Connect to WSL".
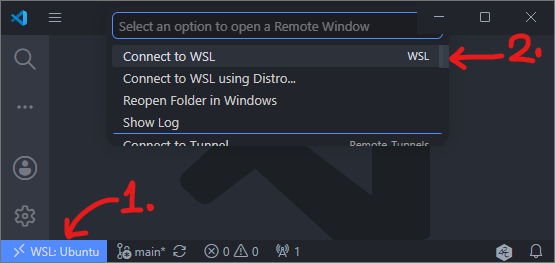
When the VS Code server is installed to WSL, open a terminal by pressing CTRL + ` (control
and back-tick). You should see that it connects to WSL's terminal automatically.
Finally, make sure Git is installed by running:
git --versionIf you see something like git version 2.40.1, it is installed
correctly.
If you get the error: git: command not found error, install Git by running:
sudo apt install gitCongratulations, you've successfully set up WSL and git!
2.3. Installing NodeJS
The final last step is to install NodeJS. In this guide, we will be using the Node Version Manager (nvm) installation method, although you are welcome to explore alternatives such as fnm and mise.
Copy the installation command listed in the nvm
instructions and
paste it into your WSL terminal.
It should look something like this:
curl -o- https://raw.githubusercontent.com/nvm-sh/nvm/v0.40.7/install.sh | bashAfter executing the installation command, close and reopen your terminal.
Install the correct version of NodeJS by running:
nvm install 24After it completes, check it installed correctly by running:
node --versionYou should see something like "v24.20.0" as the output.
Great job - you're set up to work locally on Windows now! 🪟
3. Local Setup for MacOS
Below is a video made by one of our tutors showcasing this process:
3.1. Installing VSCode
First, go and install VSCode for MacOSX.
Next, you'll need to add VS Code to your PATH variable. To do this, press
Cmd+Shift+P then type “PATH” into the command palette, choosing the option to
"Shell Command: Install 'code' command in PATH" install the code command in
your PATH.

3.2. Installing git
Open the terminal app, then run
gitThis will trigger a prompt to download extra features.
3.3. Installing NodeJS
The final last step is to install NodeJS. In this guide, we will be using the Node Version Manager (nvm) installation method, although you are welcome to explore alternatives such as fnm.
Open a terminal (Spotlight > Search "Terminal" > 1st Option).
Create a configuration file that NVM uses by running:
touch ~/.zshrcCopy the command listed in the installation instructions and paste it into a terminal.
It should look something like this:
curl -o- https://raw.githubusercontent.com/nvm-sh/nvm/v0.40.7/install.sh | bashAfter executing the installation command, close and reopen your terminal.
Install the correct version of NodeJS by running:
nvm install 24After it completes, check it installed correctly by running:
node --versionYou should see something like "v24.20.0" as the output.
Great job - you're set up to work locally on Mac now! 🍏
4. Warning
We recommend avoiding SSH-FS for COMP1531.
It has limited TypeScript support and can make working with HTTP servers difficult.
SSH-FS is a VSCode extension that allows you to work on remote files from a local instance of VSCode. It generally has better latency compared to using VSCode within a VNC. This makes it a great choice for courses which focus on text editing and running terminal commands.
On the other side, SSH-FS is not as suitable for running large multi-file projects nor making full use of an integrated developer environment (IDE). It does not reliably support VS Code's TypeScript tooling. This means errors may not be highlighted until compilation or execution. Due to the inherent nature of SSH, local web browsers and API clients will also be unable to directly connect to private CSE servers, making HTTP server testing and debugging more difficult.
As TypeScript and HTTP servers are major topics in COMP1531, SSH-FS does not support an ideal development environment - this may make it slightly more difficult for you to progress tasks.
Last updated on