Introduction
You really want to use some good tools to help you navigate, run and debug a big system like OS161. You are welcome to use any tools you like, but I guarantee that spending a few hours to learn your way around a tool like Eclipse is worth your time.
A good development environment has at least the following features:
- Syntax highlighting and the ability to automatically format code. (Saves on typing and makes it easier to read the code.)
- The ability to find function and variable declarations with a click of the mouse or a few key strokes. (When the code is spread across many files and directories, crude tools like grep just take too much time.)
- A quick way to build/rebuild only what you need. (Fortunately make does this already, but it's nice to have keyboard shortcuts too.)
- Integration with the version control system.
- An integrated debugger. This may be the most critical tool. As the size of code you work with grows, you really need to be able to set breakpoints and see what code actually runs. It is just too hard to trace the code. (However, the DEBUG macros will help a lot if you use them carefully.)
Eclipse has all of these features. It is a bit tricky to set up, and it is not fast, but it will save you time and let you spend your thinking time on the actual problems.
System Requirements
The following instructions should work on Cygwin (Windows), Linux and on Mac OS X.
You need the following (the version numbers correspond to the packages I used to prepare this document). (I've used more recent versions - Kevin)
- Eclipse Europa (Version 3.3.x)
- The CDT plugin (Version 4.0)
- Subclipse plugin (Version 1.2.3)
- The cs161 tool chain
Details
- If you are working on CSE machines, all the plugins should be installed on Eclipse so all you need to do is configure your workspace.
- If you don't already have Eclipse on your machine, you can download the Eclipse IDE for C/C++ Developers. This includes the CDT plugin so you don't need to load it separately.
- Installing plugins is usually fairly straightforward. Once you have Eclipse running go to Help->Software Updates->Find and Install. You will need to add a "New Remote Site" for Subclipse and for CDT if you don't already have it. The rest of the process is pretty automatic. The URLs for each are listed below:
- You can get the cs161 tool chain at the comp3231 web site.
Configuring Eclipse
Step 1: Getting the code from the repository
Open the "SVN Repository Exploring" perspective. By right-clicking in the "SVN Repository" window, you can add a new repository. Get the URL you should use from the getting started documentation for your campus. You will be asked for your password and then you will see the URL in the SVN Repository view. Click on the triangle to open the folder, and select the src folder. By right-clicking on the folder you can checkout the repository. Select "Checkout as a project configured using the New Project Wizard", and click on "Finish".
In the wizard, create a C Project, call it CSC369-A0 (or something similarly useful), and make it a Makefile project with the Other Toolchain. (It will take a while to check out the code.)
Step 2: A couple of kernel configuration steps
In a terminal window (Unix shell), cd into your Eclipse workspace directory
and into the CSC369-A0 project. Run ./configure to create the
defs.mk file. Next cd into kern/conf and run
./config ASST0. This will create the appropriate make files for
A0.
Step 3: Configuring the Project
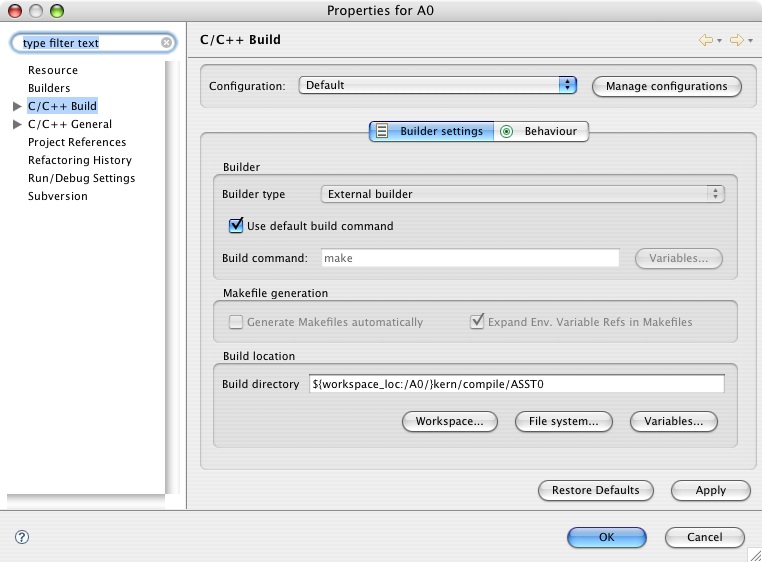
Project Properties
- C/C++ Build: Build directory: add
/kern/compile/ASST0to the end of the string that is there.(screenshot) - Environment: Add the PATH variable using "Select" and then selecting it in the list and "Edit". Add the path to
cs161-gcc. - Settings: Under "Binary Parsers" add the relevant ones to your machine (Elf and/or GNU Elf for Linux, Mach-O for Mac OS X).
Step 4: Creating Make targets
In the right pane of the C/C++ perspective are two tabs: Outline and Make.
Select the Make tab and open folders to get to
kern/compile/ASST0. Right-click on ASST0 to add Make targets. Add
targets for "all", "clean", "depend", and "install". You can make the target
name the same as the Make Target. (And yes, it is a pain to have to create
these, but you should only have to do it once.)
Tip: The icon in the upper right corner of the Make window will hide all the folders you don't care about, for a tidier view.
Step 5: Compile
If everything has gone well, you should be able to double click on depend target and then the all target and the kernel will compile. Check the Console tab at the bottom to see the compilation output.
If you get an error that it can't find cs161-gcc then the
Environment variable PATH is not set correctly (or you haven't compiled the
cs161-gcc compiler).
Finally, double click on the "install" target to install the kernel in the right location
Step 6: Running OS161
If you just want to run OS161, switch to a shell window, and cd to
~/csc369/root (or whatever your OSTREE directory is) and run
sys161 kernel. You should see some output go by and then a menu
prompt. This means that everything is working.
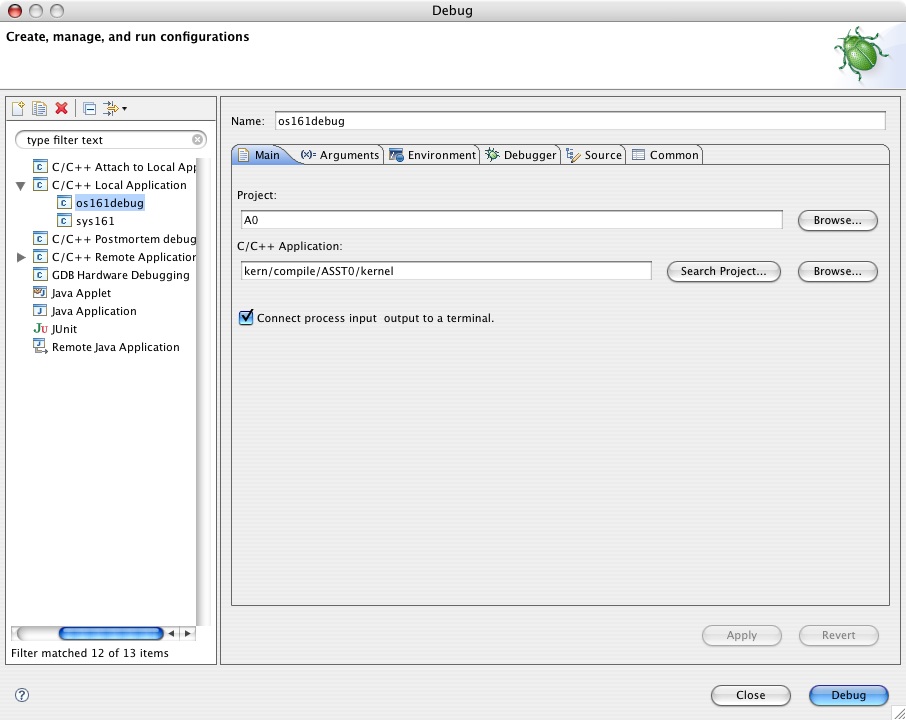
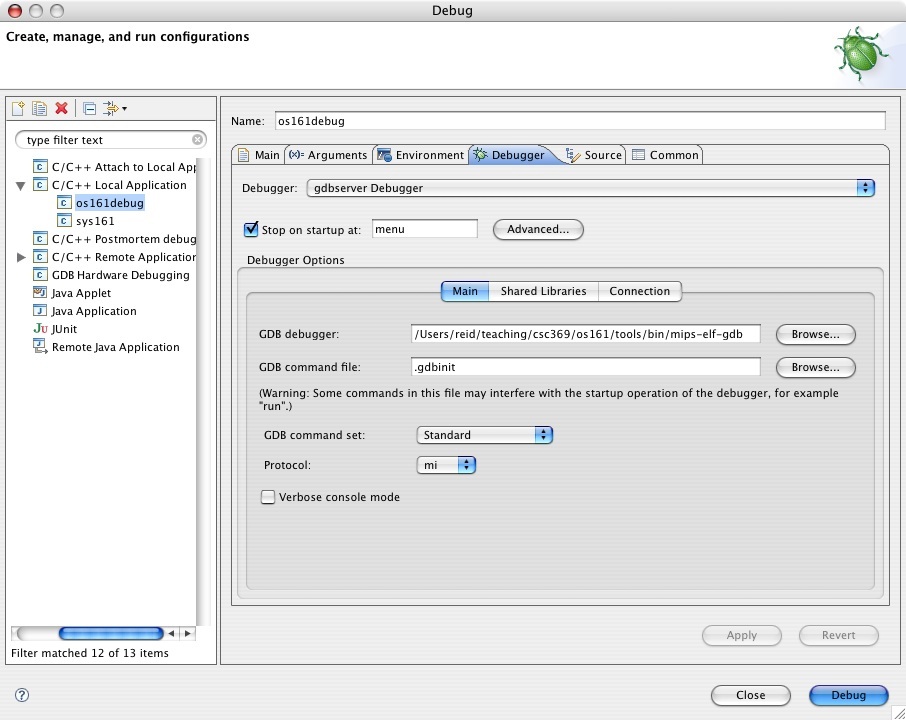
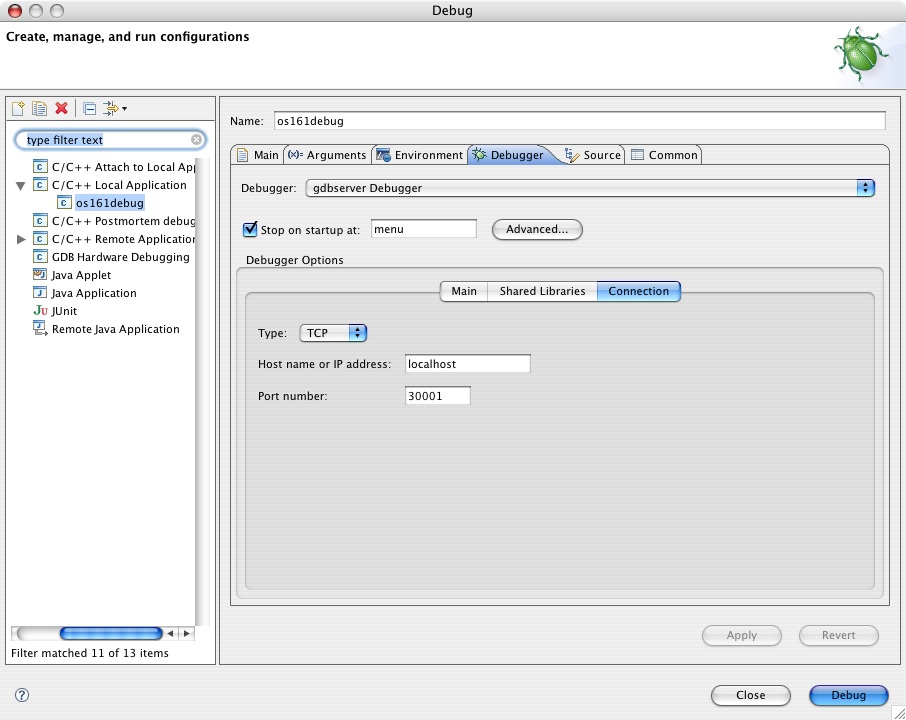
To use the debugger from within Eclipse, you first need to run sys161 in a
shell window as sys161 -p 30002 -w kernel. The -w
tells the simulator to break and wait for a debugger connection. The -p
30002 tells it that the debugger connection will be on a tcp connection
on port 30002 (you can use whichever port you want.)
Now in Eclipse, go to "Open Debug Dialog". Create a new configuration. Following are screenshots of the 3 screens where I had to change things. You will need to know the path on your own machine.