The main objectives of this assignment are:
Note: You should think carefully about the appropriate data structures and algorithms to use in your program. Before starting to write any code it is important that you fully understand the problem and determine the data structures that you will require and the algorithms to use. It is highly recommended that you start coding only after you have spent some time on these considerations, and that you use a dynamic data structure (such as a linked list) rather than a static one like an array.
' ' acting as a white pixel and the
asterisk character '*'
(or any non-space character in fact) acting as a black pixel.
For example, consider the following 8 x 8 image.
  **    \n
 ****   \n
**  **  \n
**  **  \n
******  \n
**  **  \n
**  **  \n
        \n
Some sample image files will be supplied but you should also create some
of your own for testing.
In the 1970s the quad tree data structure signalled a revolution in image processing. Quad trees allowed for a compact representation of images together with straightforward algorithms for certain graphical manipulations.
The basic idea behind quad trees is quite simple.
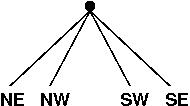
An image is divided into equal quadrants:
| NW | NE |
| SW | SE |
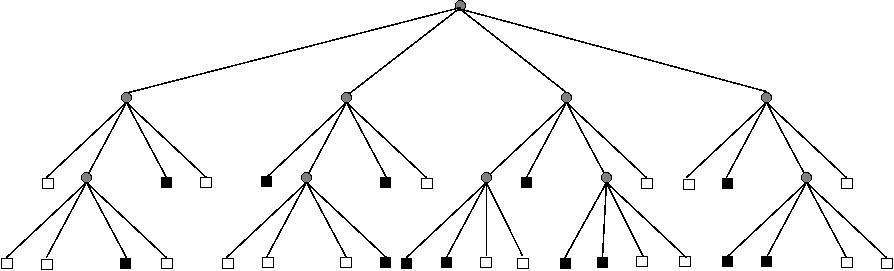
Note that quad trees work with images that are 2n x 2n pixels for some integer value of n. We will assume that the images supplied to our program are also of such dimensions. (If they are not, the supplied function will attempt to "fill out" the image with white pixels.)
Some transformations of the quad tree data structure will be explained below in Stage 4.
filename
dimension
quad tree data structure
hw3/src
as a base for you to begin the assignment.
Notice that it consists of two files
hw3.c and quadtree.c,
and the header file quadtree.h.
Copy these files to your own directory and compile
them by typing
gcc -Wall -o hw3 hw3.c quadtree.cNow run the program. You will be presented with these options:
Enter (A,I,P,F,B,D,L,R,M,NE,NW,SW,SE,O,U,Q, H for Help):If you type '
h' for Help, you will see
a more detailed list of commands:
 A - Add image
 I - Index
 P - Print image
 F - Forward
 B - Back
<k>- make image number k the current image
 D - Delete image
 L - Look for image
 R - Rotate image counterclockwise
 M - Mirror image (reflect vertically)
NE - zoom into North East corner
NW - zoom into North West corner
SW - zoom into South West corner
SE - zoom into South East corner
 O - zoom Out
 U - Undo
 H - Help
 Q - Quit
Makefile as discussed in Lab 8,
so that the program will be re-compiled
when you type "make",
producing an executable called hw3.
 A - Add image
 I - Index
 P - Print image
The
A command allows the user to add a new
image from a specified file. For example, if the image
is a filed called "canada", it could be added by typing
a canadaThe funtion
getImage() in the file
quadtree.c has been supplied to help you:
QTnode *getImage( char *filename, int *dim )It takes the name of the file as a string filename and returns a pointer to the quad tree data structure and the dimension of the image in the argument dim that needs to be passed by reference to the function. You will need to store and keep track of all this information in the linked list data structure that you design. You will also need to keep track of the image number of that image (see below). After each new image is added, your program should print the image number, dimension and name of the newly added image, as follows:
*1 [16] canadaThe star
* at the beginning of the line indicates
that this is the current image.
When a new image is added, it always goes to the tail
of the list and becomes the current image.
The I command should print a list of all the
stored images, in the order in which they were added.
For example:
 1 [16] canada
 2 [ 8] tonga
*3 [16] australia
The current image should be distinguished by a star
*
at the beginning of the line;
the other images should begin their line with a blank space.
The dimension of each image should be printed with a minimum
of 2 characters, using the format "[%2d]".
The P command should print the current image
using the function printImage() in quadtree.c
void printImage( QTnode *qt, int dim )
 F - Forward
 B - Back
<k>- make image number k the current image
 D - Delete image
 L - Look for image
The
F and B commands
allow the user to move Forward and Back in the list
by changing which image is the "current" image.
The F command finds the next image
after the current image and makes it the current image.
The B command finds the previous image
to the current image, and makes it the current image.
F has no effect if the current image
is the last image in the list;
B has no effect
if the current image is the first image in the list.
When the user types a number k,
the image with that image number should become
the current image.
If there is no image with the specified image number,
this command should have no effect.
The D command should remove the current
image from the list and free up any memory it occupied.
The new current image should be the next one after
the deleted image. If the deleted image
was the last image in the list, the previous image
(which is now the last image)
should become the current image.
After a deletion, the remaining images should be
re-numbered to fill the gap created by the deleted image.
The L command should search for the first
image whose filename contains a specified string,
and make it the current image. If no such image exists,
then the command should have no effect.
For example, to search for the first image whose name
contains the substring "trali", you would type
l traliAfter each successful
F,B,<k>,D or L
command, your program should print the image number, dimension
and name of the current image
(as described above).
 R - Rotate image counterclockwise
 M - Mirror image (reflect vertically)
NE - zoom into North East corner
NW - zoom into North West corner
SW - zoom into South West corner
SE - zoom into South East corner
 O - zoom Out
The zoomed-in image should keep the same dimension, and therefore occupy the same amount of space on the screen as the original image.
If the image has already been zoomed into a leaf node
(all black or all white), the commands
NE,NW,SW,SE should have no effect.
If the image has been zoomed out to its original
scale, the O command should have
no effect.
When a zoomed-in image is rotated (or reflected), the entire image should be rotated (or reflected), but only the currently visible portion should remain visible. In other words, the combination of zooming in, rotating and zooming out should have the same effect as rotating the original image.
After each R,M,NE,NW,SE,SW or O
command, your program should print the current image
using the function
printImage()
in quadtree.c
For example, here's how a session might look:
Enter (A,I,P,F,B,D,L,R,M,NE,NW,SW,SE,O,U,Q, H for Help): a tonga
*1 [ 8] tonga
Enter (A,I,P,F,B,D,L,R,M,NE,NW,SW,SE,O,U,Q, H for Help): p
     ***
  *  ***
 *** ***
  *  ***
     ***
********
********
********
Enter (A,I,P,F,B,D,L,R,M,NE,NW,SW,SE,O,U,Q, H for Help): nw


    **
    **
  ******
  ******
    **
    **
Enter (A,I,P,F,B,D,L,R,M,NE,NW,SW,SE,O,U,Q, H for Help): q
Bye!
U - UndoThe
U command should undo the effect
of the (most recent) previous command.
If the previous command changed the image list
or the current image
(A,F,B,<k>,D,L)
then the Undo should restore the image list
and the current image to their prior state,
and print the image number, dimension and name
of the current image.
If the previous command transformed a particular image
(R,M,NE,NW,SE,SW,O) then the Undo
should restore that image to its prior state,
and print the restored image using
printImage().
If the previous command was I,P
or H, or had "no effect"
in terms of changing the image list or
changing/transforming the current image,
then the Undo should have no effect,
and should not print anything.
You do not need to consider the case of two Undo commands in a row.
hw3/sample
(also available as a zip file
sample.zip).
A compiled solution to the assignment has been provided for you in the
executable tools/hw3.cse
Your program should produce exactly the same output as this executable.
Feel free to copy chunks of code from the
list.c program, if you find it helpful.
Makefile as well as
program files (.c and .h files).
Once submissions are open, you should submit by typing
give cs1917 hw3 Makefile *.[ch]
Please ensure that you submit the source files and NOT any
binary file (i.e., compiled hw3 or .o files).
There is no need to submit the binary file as we will compile
your program using your Makefile before testing it via the
automarking program.
It is therefore VERY IMPORTANT that you include a Makefile
in your submission and that, when run with the make
command, it will produce a compiled binary file called hw3
which performs exactly as described in the specification.
You do not need to submit quadtree.h or
quadtree.c because these files will be provided automatically.
You can submit as many times as you like - later submissions will overwrite earlier ones. You can check that your submission has been received by using the following command:
1917 classrun -check
The submission deadline is Sunday 16 October, 11:59 pm
15% penalty will be applied to the (maximum) mark
for every 24 hours late after the deadline.
Additional information may be found in the FAQ and will be considered as part of the specification for the project. Questions relating to the project can also be posted to the MessageBoard on the course Web page.
If you have a question that has not already been answered on the FAQ
or the MessageBoard, you can email it to your tutor,
or to cs1917.hw3@cse.unsw.edu.au
Programs that generate compilation errors will receive a very low mark, no matter what other virtues they may have. In general, a program that attempts a substantial part of the job but does that part correctly will receive more marks than one attempting to do the entire job but with many errors.
Group submissions will not be allowed. Your program must be entirely your own work. Plagiarism detection software will be used to compare all submissions pairwise (including submissions for similar projects in previous years, if applicable) and serious penalties will be applied, particularly in the case of repeat offences.
DO NOT COPY FROM OTHERS; DO NOT ALLOW ANYONE TO SEE YOUR CODE
Please refer to the Yellow Form, or to section on Originality of Assignment Submissions in the Unix Primer, as well as the CSE Addendum to the UNSW Plagiarism Policy if you require further clarification on this matter.
Good luck!