Programming Fundamentals

Welcome to our SplashKit activity page! Designed to ignite your creativity, these walkthroughs will guide you into the world of Graphical User Interfaces (GUIs) with ease.
With SplashKit, a toolkit tailored for beginners, you'll find GUI development both accessible and enjoyable. It simplifies the process of creating windows, drawing graphics, and managing user input, allowing you to focus on bringing your ideas to life.
Through the activities on this page, you'll gain hands-on experience with SplashKit, mastering the basics while building confidence in your programming skills.
Dive in, explore, and let your imagination guide you as you discover the exciting possibilities of GUI programming!
Are you ready to bring your C programs to life with colour, graphics, and interactivity?
This activity is the first in a series that will take your programs beyond printf() and the terminal.
SplashKit
Graphical User Interfaces (GUIs) allow programs to display graphics, text, buttons, and other dynamic elements in dedicated application windows.
SplashKit is a beginner-friendly toolkit that simplifies GUI development, making it easy to write programs that create windows, draw graphics, and handle user input with minimal setup.
Getting Started
Let's get everything set up so you can start coding with SplashKit:
- Create a Project Directory.
- Install SplashKit.
- Compile an Example File.
- Run the Example Program.
- Set up the VS Code Project.
1. Create a Project Directory
As you progress through these activities, you will be working with many files. Creating a folder for each activity is essential and will help to keep your files organised.
First, create a new directory to store all of your SplashKit projects and cd into it.
mkdir splashkit
cd splashkit
Similarly, create another new directory for your first project and cd into it.
mkdir getting_started
cd getting_started
2. Install SplashKit
From your getting_started directory, install SplashKit to your CSE account using:
1511 setup-splashkit splashkit_getting_started
SplashKit should now be installed.
Use the ls command to confirm that splashkit_examples.c has been copied to your getting_started directory.
3. Compile an Example File
Until now, we’ve used dcc to compile C code.
SplashKit projects require a different compiler called skm clang++.
Compile the splashkit_examples.c file using:
skm clang++ splashkit_example.c -o splashkit_example
If SplashKit was installed correctly, you will see this message:
🎉 clang++ command run successfully 🎉
Use the ls command to confirm that a file named splashkit_example exists in your getting_started directory
4. Run the Example Program
We run SplashKit programs the same way that we run our C programs.
Run the example program with the following command.
./splashkit_example
A window opens, displaying "Hello, SplashKit!", then closes after 5 seconds.
5. Set Up the VS Code Project
Use pwd to ensure that you're in the getting_started directory, then open it with code ..
VS Code lists your project files on the left (press Ctrl+B if it's missing).
Click on splashkit_example.c to open it:

Notice anything strange? VS Code is highlighting errors on nearly every line!
This is because VS Code doesn't know about SplashKit.
Close VS Code and run the following command from inside your project directory:
1511 setup-splashkit-directory
Reopen the project with code . and the errors should be gone!
You will learn more about how the example code works in the upcoming SplashKit activities. For now, note the line #include <splashkit.h> at the top of the file. This is similar to #include <stdio> and it allows us to use the SplashKit toolkit in our code.
SplashKit Summary
We've covered a lot of material to get started. Here's what to remember:
- SplashKit is installed once with
1511 setup-splashkit splashkit_getting_started. - Create a separate directory for each SplashKit project.
- Set up each SplashKit directory with
1511 setup-splashkit-directory. - SplashKit projects are opened with
code .. - Compile SplashKit code with
skm clang++instead ofdcc. - Run SplashKit programs normally e.g.
./program_name.
In this activity, you will learn how to manage windows with SplashKit.
A window is a rectangular area on the screen where graphical programs display visual elements and interact with the user. Windows are everywhere. If you're viewing this in a browser (such as Firefox, Chrome, or Safari) then the browser is open in a window. Familiar applications such as VS Code, the terminal, and file managers (Finder on macOS, File Explorer on Windows) all open in their own windows.
Setting Up
Step 1. Navigate to your SplashKit directory (the one created during SplashKit #1 - Getting Started).
cd splashkit
Step 2. Create a new directory for this activity and cd into it.
mkdir windows
cd windows
Step 3. Set up the windows directory.
1511 setup-splashkit-directory
Step 4.
Download splashkit_windows.c here
Or, copy these file(s) to your CSE account using the following command:
1511 fetch-activity splashkit_windows
Step 5. Open the SplashKit project directory in VS Code.
code .
SplashKit Windows
SplashKit includes a windows library that allows programs to open and close windows. Opening a window gives your program a dedicated space to display graphics and receive user input, while closing it is crucial for freeing up resources and providing a clear way for users to exit.
To use SplashKit's libraries add #include <splashkit.h> near the top of a .c file.
Once you do this, you have a starting point for all of your SplashKit programs:
#include <splashkit.h>

int main(void) {
    // we will be adding more code here

    return 0;
}
Opening Windows
SplashKit's open_window() function creates a new window and displays it on the screen.
window open_window(string caption, int width, int height);
The following statement opens a window titled "My Window" with a width and height
of 800 and 600 pixels respectively.
open_window("My Window", 800, 600);
Delay/Wait
Imagine you want to show a quick welcome message or instructions on the screen, but you don't want the program to instantly jump to the next step. By pausing for a couple of seconds you give the user time to understand what's being shown before continuing.
SplashKit provides a delay() function. Calling this will pause our program
for a specified amount of time.
void delay(int milliseconds);
For example:
delay(7000);
This pauses program execution for 7 seconds (7000 milliseconds) before continuing.
Closing Windows
When you're finished with the window, you can close it with close_all_windows().
void close_all_windows(void);
We call this function with no arguments:
close_all_windows();
Putting It All Together
Combining these operations yields a short program:
#include <splashkit.h>

int main(void) {
    open_window("My Window", 800, 600);
    delay(7000);
    close_all_windows();

    return 0;
}
This program:
- Opens a window titled "My Window" width and height of
800and600pixels respectively. - Pauses program execution for
7seconds, keeping the window open. - Closes the window before exiting.
#include <splashkit.h>

#define WIDTH 400
#define HEIGHT 240
#define DELAY_DURATION 4000

int main(void) {
    // window open_window(string caption, int width, int height);
    // Open a window of width 640 pixels and height 480 pixels
    open_window("My First Window", 640, 480);

    // void delay(int milliseconds);
    // Wait two seconds (2000 milliseconds)
    delay(2000);

    // void close_all_windows(void);
    // Close the window
    close_all_windows();

    // Open a second window, this time using #defined constants
    open_window("My Second Window", WIDTH, HEIGHT);
    delay(DELAY_DURATION);
    close_all_windows();

    // Open a third window, this time using variables as arguments
    int width = 960;
    int height = 360;
    int duration = 3000;
    open_window("My Third Window", width, height);
    delay(duration);
    close_all_windows();

    return 0;
}
Activity
Now you have a chance to practice what you've learned!
Create a program splashkit_windows.c. It should:
- Prompt the user for a width.
- Prompt the user for a height.
- Prompt the user for a duration.
- Open a window of the given size.
- Wait for the specified duration, keeping the window open.
- Close the window.
Examples
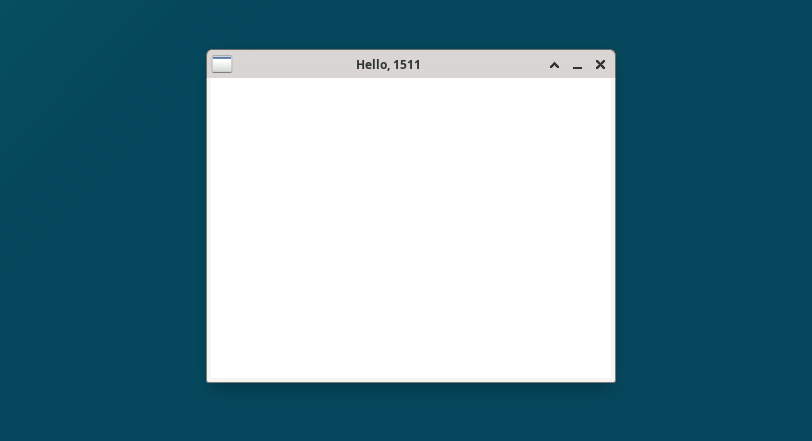
Example 1: Opening a 400×300 Window for 5 Seconds
skm clang++ splashkit_master.c -o splashkit_master
./splashkit_master
Enter a window width (pixels): 400
Enter a window height (pixels): 300
Enter a duration (seconds): 5
After the user enters these values, a window should appear as shown below and automatically close after 5 seconds.
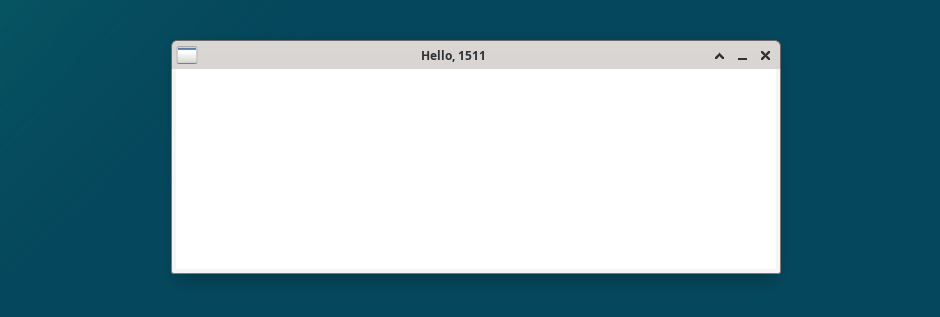
Example 2: Opening a 600×200 Window for 12 Seconds
skm clang++ splashkit_master.c -o splashkit_master
./splashkit_master
Enter a window width (pixels): 600
Enter a window height (pixels): 200
Enter a duration (seconds): 12
After the user enters these values, a window should appear as shown below and automatically close after 12 seconds.
Assumptions/Restrictions/Clarifications
- There are no autotests for this activity.
Summary
In this activity, you learned how to work with three functions to manage windows:
open_window(caption, width, height)- Opens a new window on the screen.delay(milliseconds)- Pauses program execution.close_all_windows()- Closes all windows.
List of New Functions
At the end of each activity, you'll find a list of all new function prototypes.
Keeping a list of these functions as you progress will be useful for whenever you need a quick refresher.
// Window Management
window open_window(string caption, int width, int height);
void close_all_windows(void);

// Program Control
void delay(int milliseconds);
Welcome to the c o l o u r f u l world of SplashKit!
In this activity, you'll discover how colours are used in SplashKit to make your programs bright and visually appealing.
With an understanding of colours, you will be able to control how shapes and text appear when displayed by your program. You'll learn:
- How colours are represented in SplashKit.
- How to use some fun, built-in colours.
- How to create your very own custom colours using RGB values.
Setting Up
Step 1. Navigate to your SplashKit directory (the one created during SplashKit #1 - Getting Started).
cd splashkit
Step 2. Create a new directory for this activity and cd into it.
mkdir colours
cd colours
Step 3. Set up the colours directory.
1511 setup-splashkit-directory
Step 4.
Download splashkit_colours.c here
Or, copy these file(s) to your CSE account using the following command:
1511 fetch-activity splashkit_colours
Step 5. Open the SplashKit project directory in VS Code.
code .
SplashKit Colours
SplashKit provides a color library that includes:
- 144 built-in preset colours.
- Functions to define over 16 million custom colours.
- A
colordata type to store our colours as variables.
Our starter code is a familiar program from SplashKit #2 - Windows.
Copy this into a file named playground.c. Then, you can use this "playground" to experiment with colours as you progress through this activity.
#include <splashkit.h>

int main(void) {
    open_window("My Window", 800, 600);

    // TODO: we will add code here

    delay(2000);

    close_all_windows();
    return 0;
}
This program:
- Opens a window with a default (white) background.
- Pauses for 2 seconds.
- Closes the window and exits.
Compile and run it with:
skm clang++ playground.c -o playground
./playground
Clear and Refresh
To explore SplashKit's colours, we'll be changing the background colour of our window.
When you call clear_screen(), SplashKit changes the window's background to the colour you specify.
For example, the following statement clears our window and paints the background black:
clear_screen(COLOR_BLACK);
Note that calling clear_screen() alone won't display the new colour right away. SplashKit waits until you call refresh_screen() before showing any changes. So to make the update visible, follow the clear_screen() call with:
refresh_screen();
Calling refresh_screen() applies all pending updates to the window, allowing you to see your changes.
In later activities, you will be drawing shapes, text, and images on the window. Whether you're clearing the background or adding new elements, changes will not appear on the window until you call refresh_screen(). This function applies all pending updates since the last refresh, making your changes visible on the window.
To see how clear_screen() and refresh_screen() work together, try this program in your playground.c file. What does the program do if refresh_screen() isn't called? Try it and see!
#include <splashkit.h>

int main(void) {
    open_window("Clear and Refresh", 800, 600);
    delay(2000);

    // Clear the window and colour it black.
    clear_screen(COLOR_BLACK);
    // Refresh the screen to display our changes.
    refresh_screen();
    // Pause the program for 2 seconds.
    delay(2000);

    close_all_windows();
    return 0;
}
This program:
- Opens a window with a default (white) background.
- Pauses for 2 seconds.
- Calls
clear_screen(COLOR_BLACK)to paint the window black. - Calls
refresh_screen()to update the window with the changes fromclear_screen(). - Pauses for 2 seconds.
- Closes the window and exits.
Preset Colours
We're not limited to COLOR_BLACK. SplashKit provides 144 built-in presets!
Here are a few to choose from:
- COLOR_ORANGE_RED
- COLOR_DEEP_SKY_BLUE
- COLOR_PURPLE
- COLOR_DARK_TURQUOISE
These values are like #defined constants, but for colours. Whenever a SplashKit function expects a colour parameter, we can use these as arguments. For example, we could call clear_screen() with:
clear_screen(COLOR_ORANGE_RED);clear_screen(COLOR_PURPLE);clear_screen(COLOR_DARK_TURQUOISE);
To see how different colour presets can be used, run this program in your playground.c file.
#include <splashkit.h>

#define DELAY_DURATION 2000

int main(void) {
    open_window("Using Preset Colours", 640, 480);

    // Black
    clear_screen(COLOR_BLACK);
    refresh_screen();
    delay(DELAY_DURATION);

    // Orange Red
    clear_screen(COLOR_ORANGE_RED);
    refresh_screen();
    delay(DELAY_DURATION);

    // Sky Blue
    clear_screen(COLOR_DEEP_SKY_BLUE);
    refresh_screen();
    delay(DELAY_DURATION);

    // Purple
    clear_screen(COLOR_PURPLE);
    refresh_screen();
    delay(DELAY_DURATION);

    // Dark Turquoise
    clear_screen(COLOR_DARK_TURQUOISE);
    refresh_screen();
    delay(DELAY_DURATION);

    close_all_windows();
    return 0;
}
This program:
- Opens a window with a default (white) background.
- Pauses for 2 seconds.
- Colours the window BLACK
- Pauses for 2 seconds.
- Colours the window ORANGE_RED
- Pauses for 2 seconds.
- Colours the window DEEP_SKY_BLUE
- Pauses for 2 seconds.
- Colours the window PURPLE
- Pauses for 2 seconds.
- Colours the window DARK_TURQUOISE
- Pauses for 2 seconds.
- Closes the window and exits.
For more preset colours:
- Visit SplashKit's Colour Generator.
- Scroll down to the Colour Palette.
- Click on a colour.
- The name will appear below.

In the example above, the selected colour is COLOR_MEDIUM_BLUE.
The color Data Type
SplashKit provides a custom data type called color. Just like an int holds a number, a color holds a colour.
For example, you can assign a preset colour to a variable and pass it around your program:
color my_colour = COLOR_BLACK;
clear_screen(my_colour);
refresh_screen();
This code snippet:
- Declares a
colorvariable namedmy_colour. - Assigns it the value
COLOR_BLACK. - Uses
my_colourto paint the window black. - Calls
refresh_screen()to display the change of colour.
Custom Colours
If the preset colours aren't enough, SplashKit gives you full control to construct over 16 million unique colours with an RGB colour model.
You can create colours by specifying how much of each colour component (red, green, and blue) to mix together. By mixing different amounts, you can produce just about any colour you can think of.
Each component can be assigned a value from 0 to 255 where:
- 0 means "none of that colour".
- 255 means "as much of that colour as possible".
These components are mixed with the rgb_color() function
color rgb_color(int red, int green, int blue);
which takes in three int values, one for each colour component, and returns a variable of type color.
Primary RGB Colours: Red, Green, Blue
These examples demonstrate how setting one component to its maximum value (255) while keeping the others at 0 results in the primary colours of the RGB colour model.
color red
= rgb_color(255,
0,
0);
color green
= rgb_color(0,
255,
0);
color blue
= rgb_color(0,
0,
255);
Any Colour You Like
Experiment with different values in rgb_color() to invent your own unique shades!
Here are four extra colours to spark your creativity.
color sea_green
= rgb_color(102,
194,
165);
color apricot_orange
= rgb_color(252,
141,
98);
color wisteria_blue
= rgb_color(141,
160,
203);
color orchid_purple
= rgb_color(231,
138,
195);
Colours For All
Approximately 4-5% of the population lives with a Colour Vision Deficiency that affects how they perceive and distinguish colours. Although no single colour palette ensures universal accessibility, using a palette such as Okabe-Ito (below) can help make colours more enjoyable for all users.
color black
= rgb_color(0,
0,
0);
color orange
= rgb_color(230,
159,
0);
color sky_blue
= rgb_color(86,
180,
233);
color bluish_green
= rgb_color(0,
158,
115);
color yellow
= rgb_color(240,
228,
66);
color blue
= rgb_color(0,
114,
178);
color vermillion
= rgb_color(213,
94,
0);
color reddish_purple
= rgb_color(204,
121,
167);
Black, White, and Grey
A colour appears as a shade of grey when all three RGB components have the same value.
color black
= rgb_color(0,
0,
0);
color darkgrey
= rgb_color(63,
63,
63);
color grey
= rgb_color(127,
127,
127);
color lightgrey
= rgb_color(181,
181,
181);
color white
= rgb_color(255,
255,
255);
To see how custom colours can be used, test this program in playground.c.
#include <splashkit.h>

#define DELAY_DURATION 2000

int main(void) {
    open_window("RGB Colours", 640, 480);

    color deep_blue  = rgb_color(  0, 114, 178);
    color vermillion = rgb_color(213,  94,   0);
    color blue_green = rgb_color(  0, 158, 115);
    color yellow     = rgb_color(240, 228,  66);

    // Deep Blue
    clear_screen(deep_blue);
    refresh_screen();
    delay(DELAY_DURATION);

    // Vermillion
    clear_screen(vermillion);
    refresh_screen();
    delay(DELAY_DURATION);

    // Blue Green
    clear_screen(blue_green);
    refresh_screen();
    delay(DELAY_DURATION);

    // Yellow
    clear_screen(yellow);
    refresh_screen();
    delay(DELAY_DURATION);

    close_all_windows();
    return 0;
}
This program:
- Opens a window with a default (white) background.
- Defines five custom colours with
rgb_color()and assigns them to the variablesdeep_blue,vermillion,blue_green, andyellow. - Displays each colour on the screen for 2 seconds.
- Closes the window and exits.
For more custom colours:
- Visit SplashKit's Colour Generator.
- Scroll down to the Colour Generator.
- Set values for red, green, and blue.
- Preview the RGB colour.
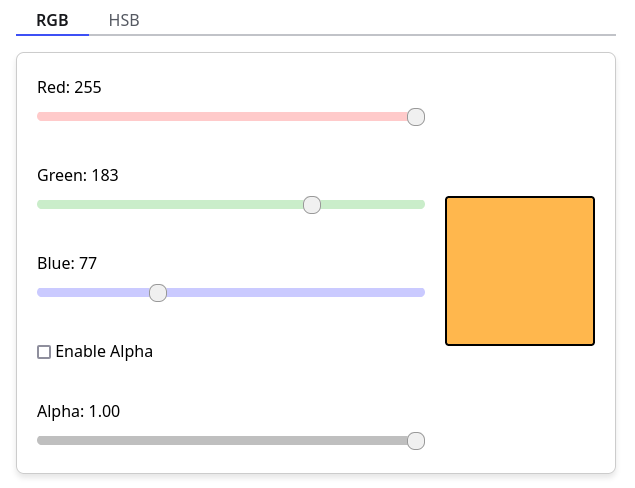
In the example above, the warm orange colour can be assigned to a variable with:
color warm_orange = rgb_color(255, 183, 77);
Activity
Create a program splashkit_colours.c. It should:
- Prompt the user for a red value from 0 to 255.
- Prompt the user for a green value 0 to 255.
- Prompt the user for a blue value 0 to 255.
- Open a window 960 pixels wide and 360 pixels in height.
- Display the corresponding RGB colour for 5 seconds.
- Close the window.
Examples
skm clang++ splashkit_master.c -o splashkit_master
./splashkit_master
Enter a RED value (from 0 to 255): 0
Enter a GREEN value (from 0 to 255): 191
Enter a BLUE value (from 0 to 255): 255
After the user enters these values, a window should appear as shown below, displaying a deep sky blue colour for 5 seconds before closing.

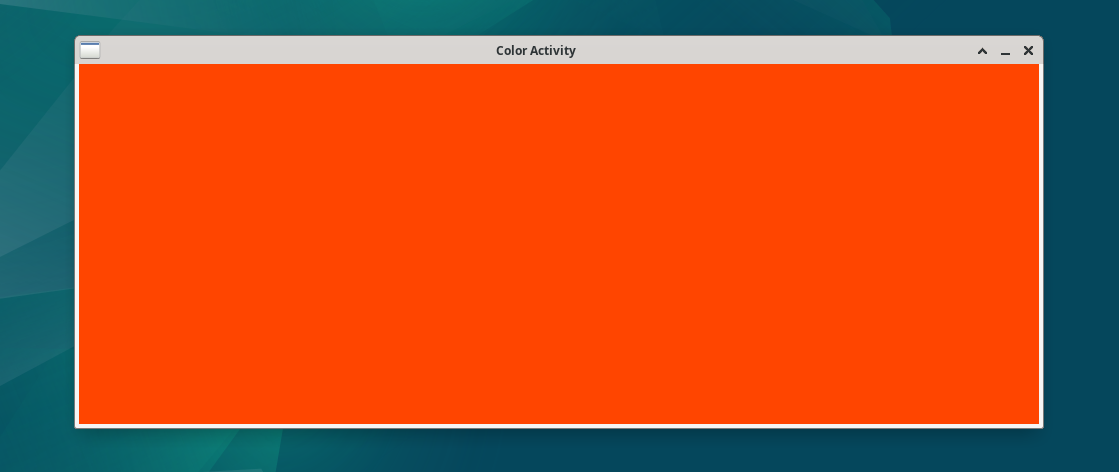
skm clang++ splashkit_master.c -o splashkit_master
./splashkit_master
Enter a RED value (from 0 to 255): 255
Enter a GREEN value (from 0 to 255): 69
Enter a BLUE value (from 0 to 255): 0
Similarly, a window should appear as shown below, displaying an orange red colour for 5 seconds before closing.
Assumptions/Restrictions/Clarifications
- There are no autotests for this activity.
Summary
In this activity, you learned how to work with three functions to manage colours:
clear_screen(color)- Clears the window and changes the background colour.refresh_screen()- Applies changes to display them on the window.rgb_color(red, green, blue)- Creates a colour from RGB components.
Types and Functions
// Screen Management
void clear_screen(color clr);
void refresh_screen(void);

// Colours
color rgb_color(int red, int green, int blue);

// Okabe-Ito Accessible Colour Palette
color black          = rgb_color(  0,   0,   0);
color orange         = rgb_color(230, 159,   0);
color sky_blue       = rgb_color( 86, 180, 233);
color bluish_green   = rgb_color(  0, 158, 115);
color yellow         = rgb_color(240, 228,  66);
color blue           = rgb_color(  0, 114, 178);
color vermillion     = rgb_color(213,  94,   0);
color reddish_purple = rgb_color(204, 121, 167);
// Window Management
window open_window(string caption, int width, int height);
void close_all_windows(void);

// Program Control
void delay(int milliseconds);

// Screen Management
void clear_screen(color clr);
void refresh_screen(void);

// Colours
color rgb_color(int red, int green, int blue);

// Okabe-Ito Accessible Colour Palette
color black          = rgb_color(  0,   0,   0);
color orange         = rgb_color(230, 159,   0);
color sky_blue       = rgb_color( 86, 180, 233);
color bluish_green   = rgb_color(  0, 158, 115);
color yellow         = rgb_color(240, 228,  66);
color blue           = rgb_color(  0, 114, 178);
color vermillion     = rgb_color(213,  94,   0);
color reddish_purple = rgb_color(204, 121, 167);
In previous activities you learned how to:
- Open a window.
- Define and use colours.
- Clear and refresh the screen.
In this activity, we'll explore how to draw various shapes onto our window. This includes: pixels, lines, rectangles, circles, ellipses, and triangles. We'll also extend our knowledge of colours with semi-transparent colours.
Setting Up
Step 1. Navigate to your SplashKit directory (the one created during SplashKit #1 - Getting Started).
cd splashkit
Step 2. Create a new directory for this activity and cd into it.
mkdir drawing
cd drawing
Step 3. Set up the drawing directory.
1511 setup-splashkit-directory
Step 4.
Download splashkit_master.c here
Or, copy these file(s) to your CSE account using the following command:
1511 fetch-activity splashkit_master
Step 5. Open the SplashKit project directory in VS Code.
code .
SplashKit Drawing
SplashKit provides a graphics library that includes functions to draw shapes such as:
- Pixels.
- Lines.
- Rectangles.
- Circles.
- Ellipses.
- Triangles.
Our starter code is a familiar program from SplashKit #2 - Windows and includes an accessible palette of colours from SplashKit #3 - Colours.
Copy this into a file named playground.c. You can then use this "playground" to experiment with sample
programs as you progress through this activity.
#include <splashkit.h>

int main(void) {
    open_window("My Window", 800, 600);

    color black = rgb_color(0, 0, 0);
    color orange = rgb_color(230, 159, 0);
    color sky_blue = rgb_color(86, 180, 233);
    color bluish_green = rgb_color(0, 158, 115);
    color yellow = rgb_color(240, 228, 66);
    color blue = rgb_color(0, 114, 178);
    color vermillion = rgb_color(213, 94, 0);
    color reddish_purple = rgb_color(204, 121, 167);

    // TODO: we will add code here

    delay(2000);

    close_all_windows();
    return 0;
}
This program:
- Opens a window with a default (white) background.
- Declares and initialises colours from the Okabe-Ito palette.
- Pauses for 2 seconds.
- Closes the window and exits.
Compile and run it with:
skm clang++ playground.c -o playground
./playground
Pixels
A pixel is the smallest visible element displayed on a screen.
When you create a SplashKit window that's 800 pixels wide by 600 pixels in height, imagine it as a grid with 800 columns and 600 rows. Each square (pixel) in this grid can be individually set to display its own colour. By changing the colours of enough pixels, you can form images, shapes, or even patterns on the screen.
The simplest drawing function is:
void draw_pixel(color clr, double x, double y);
This changes the colour of a single pixel at coordinates (x, y).
- The coordinates
(0, 0)represent the pixel at the top-left corner of the window. - The
xcoordinate increases as you move to the right. - The
ycoordinate increases as you move down.
For example, the following snippet demonstrates how you can colour individual pixels using the draw_pixel() function:
draw_pixel(orange, 2, 1);
draw_pixel(sky_blue, 5, 3);
draw_pixel(bluish_green, 0, 5);
refresh_screen();
This snippet colours the pixels at position (2, 1), (5, 3), and (0, 5) orange, sky blue, and blueish-green respectively before calling refresh_screen() to ensure that these changes are displayed on the window.
The image below shows how these pixel changes would appear on a grid representing an 8-by-6 window.
To see how draw_pixel() works, try this program in your playground.c file.
What does the program do if refresh_screen() isn't called? Try it and see!
#include <splashkit.h>

int main(void) {
    open_window("Your Turn: Draw Pixels", 800, 600);

    // draw a pixel at point (x, y) = (583, 168)
    // x = 583 means the pixel is drawn 583 pixels from the left edge
    // y = 168 means the pixel is drawn 168 pixels from the top edge
    draw_pixel(COLOR_BLACK, 583, 168);

    // draw a pixel at point (x, y) = (474, 102)
    // x = 474 means the pixel is drawn 474 pixels from the left edge
    // y = 102 means the pixel is drawn 168 pixels from the top edge
    draw_pixel(COLOR_BLACK, 474, 102);

    // draw two more pixels at (237, 481) and (203, 492)
    draw_pixel(COLOR_BLACK, 237, 481);
    draw_pixel(COLOR_BLACK, 203, 492);

    // draw a pixel at the top-left corner
    draw_pixel(COLOR_BLACK, 0, 0);

    // draw a pixel at the top-right corner
    draw_pixel(COLOR_BLACK, 799, 0);

    // draw a pixel at the bottom-left corner
    draw_pixel(COLOR_BLACK, 0, 599);

    // draw a pixel at the bottom-right corner
    draw_pixel(COLOR_BLACK, 799, 599);

    refresh_screen();

    delay(60000);
    close_all_windows();
    return 0;
}
This program:
- Opens a window with a default (white) background.
- Draws four pixels at randomly-chosen locations in the window
- Draws pixels in each corner of the window
- Pauses for 60 seconds.
- Closes the window and exits.
Lines
You can draw lines by manually colouring individual pixels one-at-a-time, but this becomes tedious, especially for longer lines. To simplify this process, SplashKit provides a convenient draw_line() function:
void draw_line(color clr, double x1, double y1, double x2, double y2);
This draws a line between two points. The coordinates
(x1, y1)represent the pixel where the line begins, and(x2, y2)represent the pixel where the line ends.
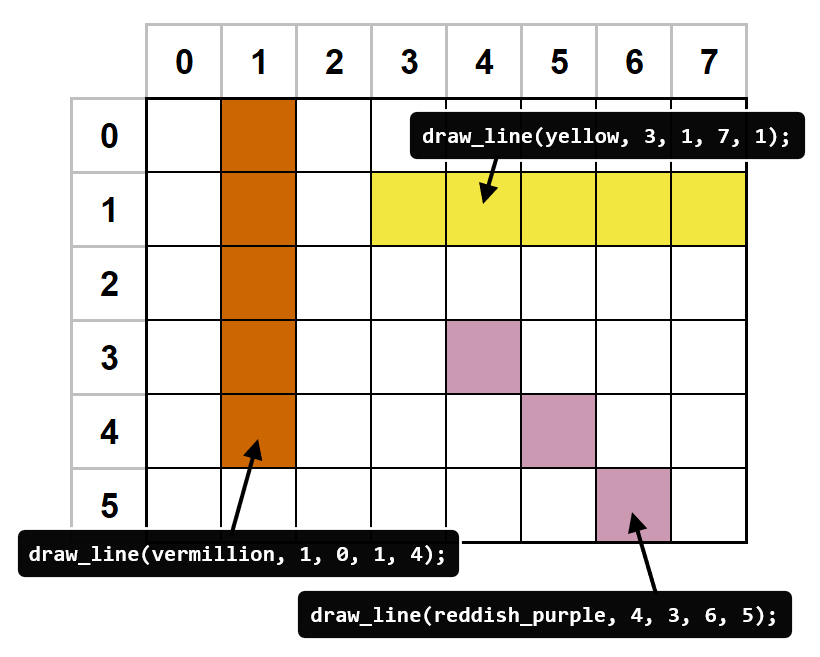
To see this in action, here is an example code snippet that draws three lines:
draw_line(yellow, 3, 1, 7, 1);
draw_line(vermillion, 1, 0, 1, 4);
draw_line(reddish_purple, 4, 3, 6, 5);
refresh_screen();
This snippet:
- Draws a horizontal yellow line from
(3, 1)to(7, 1). - Draws a vertical vermillion line from
(1, 0), to(1, 4). - Draws a diagonal reddish-purple line from
(4, 3)to(6, 5).
Calling refresh_screen() applies visual changes and displays them on the screen.
The image below illustrates how these three lines appear on a grid representing a small 8-by-6 window.
Sometimes you may want to draw lines thicker than the default size. SplashKit provides an additional function to help you do this:
drawing_options option_line_width(int width);
This functions take an integer argument width, representing how many pixels thick you want your lines to be. It returns a new data type called drawing_options which you can then use with an extended version of the draw_line() function:
void draw_line(color clr, double x1, double y1, double x2, double y2, drawing_options opts);
This extended function behaves the same as the original version, but it accepts an additional drawing_options argument.
Here's how you can use these functions together:
drawing_options thick_line = option_line_width(3);
draw_line(blueish_green, 1, 2, 5, 2, thick_line);
refresh_screen();
This snippet:
- Creates a new
drawing_optionsvariable calledthick_linewhich stores a line width of 3 pixels. - Passes the
thick_lineoption as an extra argument todraw_line()to draw a line that's 3 pixels thick. - Updates the window with
refresh_screen()to display the result.
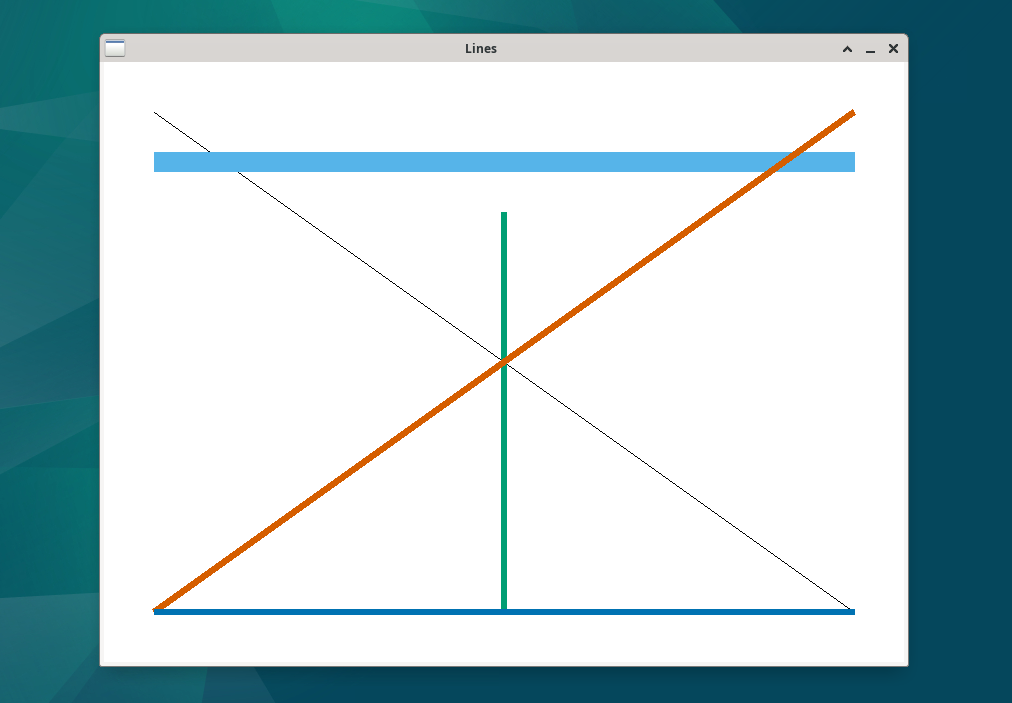
To see how draw_line() and option_line_width() can be used together, run this program in your playground.c file.
What does the program do if the width argument of option_line_width() is set to 0? Try it and see!
#include <splashkit.h>

#define DELAY 2000

int main(void) {
    open_window("Lines", 800, 600);

    color black        = rgb_color(  0,   0,   0);
    color sky_blue     = rgb_color( 86, 180, 233);
    color bluish_green = rgb_color(  0, 158, 115);
    color blue         = rgb_color(  0, 114, 178);
    color vermillion   = rgb_color(213,  94,   0);

    // draw a black diagonal  line from top-left (50, 50) to bottom-right (750, 550)
    draw_line(black, 50,  50, 750, 550);
    refresh_screen();
    delay(DELAY);

    // draw a thick sky_blue horizontal line from (50, 100) to (750, 100)
    // use the extra `option_line_width()` argument to give this line a width of 20 pixels
    draw_line(sky_blue, 50, 100, 750, 100, option_line_width(20));
    refresh_screen();
    delay(DELAY);

    // store line width drawing options in a variable
    // any line drawn with a `medium_width` option will have a width of 6 pixels
    drawing_options medium_width = option_line_width(6);

    // draw three `medium_width` lines
    draw_line(bluish_green, 400, 150, 400, 550, medium_width);
    draw_line(vermillion, 50, 550, 750, 50, medium_width);
    draw_line(blue, 50, 550, 750, 550, medium_width);
    refresh_screen();
    delay(DELAY);

    delay(60000);
    close_all_windows();
    return 0;
}
This program:
- Opens a window with a default (white) background.
- Declares and initialises colours from the Okabe-Ito palette.
- Draws a thin black diagonal line.
- Draws a thick sky blue horizontal line, using
option_line_width()to give this line a width of 20 pixels. - Stores line drawing options (a line width of 6 pixels) in a variable named
medium_width. - Draws three more medium-width overlapping lines.
- Pauses for 60 seconds.
- Closes the window and exits.
Rectangles
SplashKit provides two functions to draw rectangles:
void draw_rectangle(color clr, double x, double y, double width, double height);
void fill_rectangle(color clr, double x, double y, double width, double height);
These functions work as follows:
- Both functions take
(x, y)coordinates to specify the rectangle's top-left corner. - The
widthparameter determines how many pixels wide the rectangle is. - The
heightparameter determines how many pixels tall the rectangle is. - The difference between the two functions is:
draw_rectangle()draws only the border of the rectangle.fill_rectangle()colours the entire rectangle, filling all pixels in the specified area.
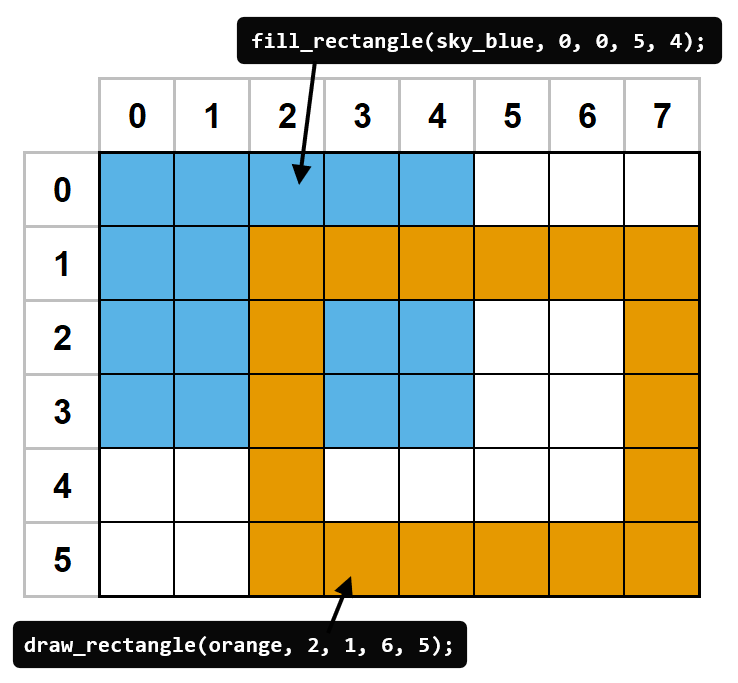
Here's an example code snippet demonstrating these functions:
fill_rectangle(sky_blue, 0, 0, 5, 4);
draw_rectangle(orange, 2, 1, 6, 5);
refresh_screen();
In this snippet:
- A solid (filled) sky-blue rectangle with its top-left corner at
(0, 0)is drawn with a width of 5 pixels and height of 4 pixels. - The outline (border) of an orange rectangle with its top-left corner at
(2, 1)is drawn with a width of 6 pixels and height of 5 pixels.
Calling refresh_screen() ensures these rectangles become visible.
The image below illustrates how these rectangles would appear if drawn on a 8-by-6 pixel grid.
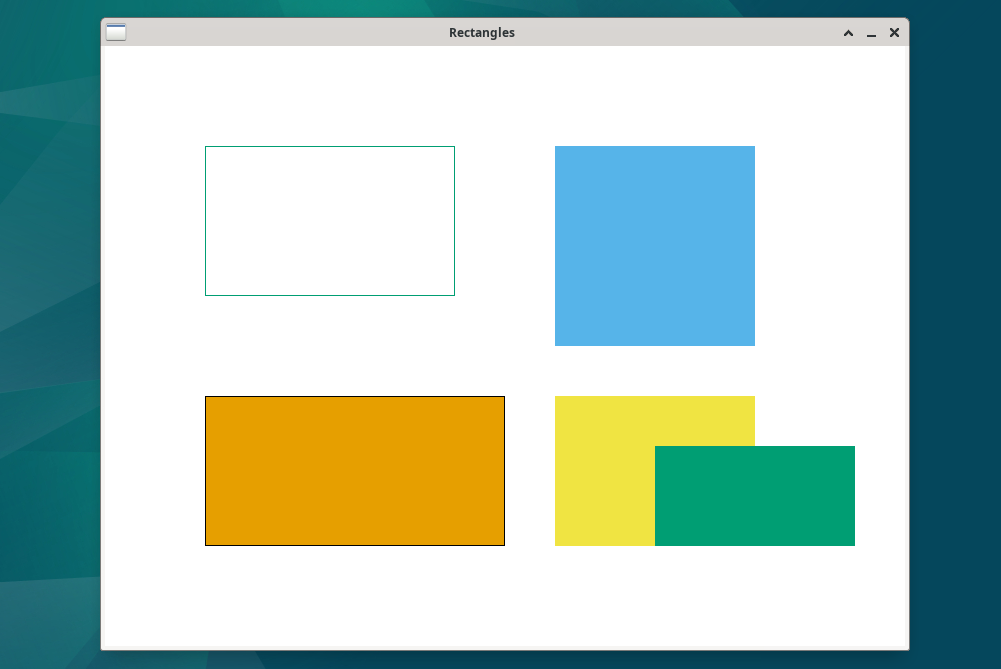
To see how draw_rectangle() and fill_rectangle() can be used, run this program in your playground.c file.
What happens if part of a rectangle falls outside of the window? Will it still be drawn? Give it a go and see for yourself!
#include <splashkit.h>

#define DELAY 2000

int main(void) {
    open_window("Rectangles", 800, 600);

    color black        = rgb_color(  0,   0,   0);
    color bluish_green = rgb_color(  0, 158, 115);
    color sky_blue     = rgb_color( 86, 180, 233);
    color orange       = rgb_color(230, 159,   0);
    color yellow       = rgb_color(240, 228,  66);

    // draw the outline of a rectangle at the top-left
    // (x,y) position of top-left corner: (100, 100)
    // width: 250 pixels
    // height: 150 pixels
    draw_rectangle(bluish_green, 100, 100, 250, 150);
    refresh_screen();
    delay(DELAY);

    // fill a rectangle at the top-right
    // (x,y) position of top-left corner: (450, 100)
    // width: 200 pixels
    // height: 200 pixels
    fill_rectangle(sky_blue, 450, 100, 200, 200);
    refresh_screen();
    delay(DELAY);

    // draw a rectangle at the bottom-left
    fill_rectangle(orange, 100, 350, 300, 150);
    // add a border to the previous rectangle
    draw_rectangle(black, 100, 350, 300, 150);
    refresh_screen();
    delay(DELAY);

    // fill two overlapping rectangles at the bottom-right
    fill_rectangle(yellow, 450, 350, 200, 150);
    fill_rectangle(bluish_green, 550, 400, 200, 100);
    refresh_screen();
    delay(DELAY);

    delay(60000);
    close_all_windows();
    return 0;
}
This program:
- Opens a window with a default (white) background.
- Declares and initialises colours from the Okabe-Ito palette.
- Draws the outline of a rectangle at the top‑left with
draw_rectangle(). - Fills a rectangle at the top‑right with
fill_rectangle(). - Draws a rectangle (with a black border) at the bottom‑left.
- Fills two overlapping rectangles at the bottom‑right.
- Pauses for 60 seconds.
- Closes the window and exits.
Circles
As with rectangles, SplashKit also provides functions to draw circles:
void draw_circle(color clr, double x, double y, double radius);
void fill_circle(color clr, double x, double y, double radius);
These two functions work as follows:
- Both functions take
(x, y)coordinates to specify the centre (origin) of the circle. - The
radiusparameter controls the size of the circle. - The difference between them is:
draw_circle()draws only the border/outline of the circle.fill_circle()draws the entire circle, completely filled with colour.
As an example, here's how you could use these functions:
fill_circle(reddish_purple, 4, 4, 4);
draw_circle(blueish_green, 10, 6, 5);
refresh_screen();
In this snippet:
- A filled reddish-purple circle is drawn with its centre at
(4, 4)and a radius of 4 pixels. - The outline of a blueish-green circle is drawn with its centre at
(10, 6)and a radius of 5 pixels.
To see how draw_circle() and fill_circle() are used, run this program in your playground.c file.
What happens if you change the radius argument of fill_circle()? try it!
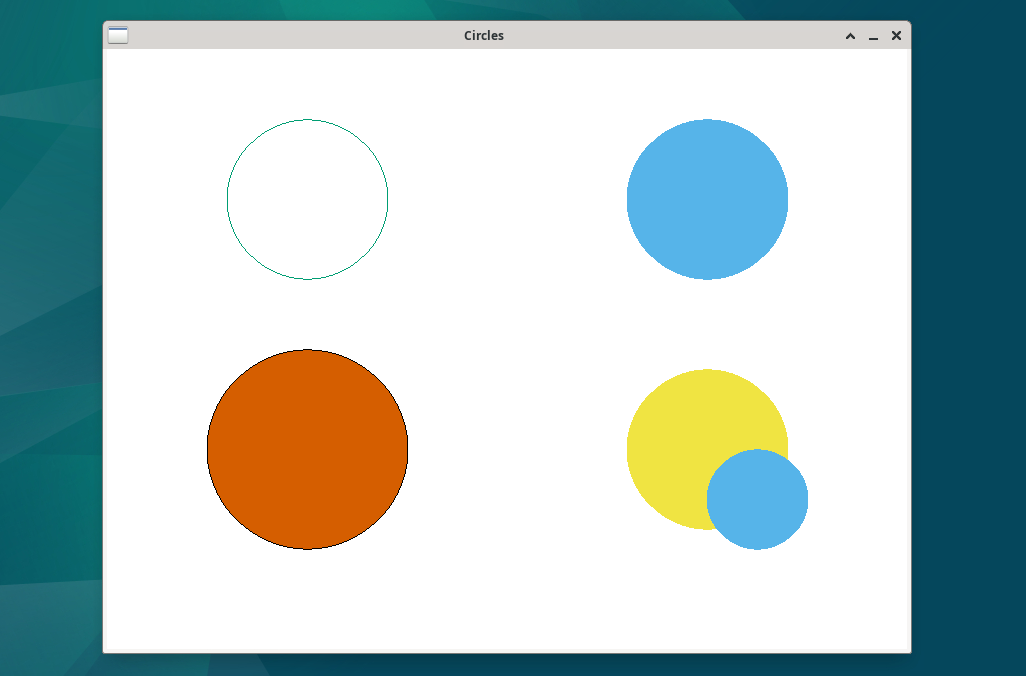
#include <splashkit.h>

#define DELAY 2000

int main(void) {
    open_window("Circles", 800, 600);

    color black        = rgb_color(  0,   0,   0);
    color bluish_green = rgb_color(  0, 158, 115);
    color sky_blue     = rgb_color( 86, 180, 233);
    color vermillion   = rgb_color(213,  94,   0);
    color yellow       = rgb_color(240, 228,  66);

    // draw the outline of a circle at the top-left
    // (x, y) position of centre: (250, 150)
    // radius: 80 pixels
    draw_circle(bluish_green, 200, 150,  80);
    refresh_screen();
    delay(DELAY);

    // fill a circle at the top right
    // (x, y) position of centre: (600, 150)
    // radius: 80 pixels
    fill_circle(sky_blue, 600, 150,  80);
    refresh_screen();
    delay(DELAY);

    // draw a circle at the bottom-left
    fill_circle(vermillion, 200, 400, 100);
    // draw a border around the previous circle
    draw_circle(black, 200, 400, 100);
    refresh_screen();
    delay(DELAY);

    // fill two overlapping circles at the bottom-right
    fill_circle(yellow, 600, 400,  80);
    fill_circle(sky_blue, 650, 450,  50);
    refresh_screen();
    delay(DELAY);

    delay(60000);
    close_all_windows();
    return 0;
}
This program:
- Opens a window with a default (white) background.
- Declares and initialises colours from the Okabe-Ito palette.
- Draws the outline of a circle at the top‑left with
draw_circle(). - Fills a circle at the top‑right with
fill_circle(). - Draws a circle (with a border) at the bottom‑left.
- Fills two overlapping circles at the bottom‑right.
- Pauses for 60 seconds.
- Closes the window and exits.
Ellipses
If you need to draw an ellipse (an oval), SplashKit includes:
void draw_ellipse(color clr, double x, double y, double width, double height);
void fill_ellipse(color clr, double x, double y, double width, double height);
Both ellipse functions use the following parameters:
(x, y)specifies the centre of the ellipse.widthandheightdefine how wide and tall the ellipse is.- The difference between the two functions is:
draw_ellipse()will only draw the ellipse's outline/border.fill_ellipse()fills the entire ellipse, including its border.
Here's how you can use these functions:
fill_ellipse(sky_blue, 5, 6, 8, 6);
draw_ellipse(orange, 11, 5, 6, 8);
refresh_screen();
In this snippet:
- A solid (filled) sky-blue ellipse is drawn, centred at
(5, 6)with a width and height of 8 and 6 pixels respectively. - An orange outline of an ellipse is drawn, centred at
(11, 5)with a width and height of 6 and 8 pixels respectively.
To see how draw_ellipse() and fill_ellipse() are used, run this program in your playground.c file.
What happens if the width of an ellipse is negative number? Try it out!
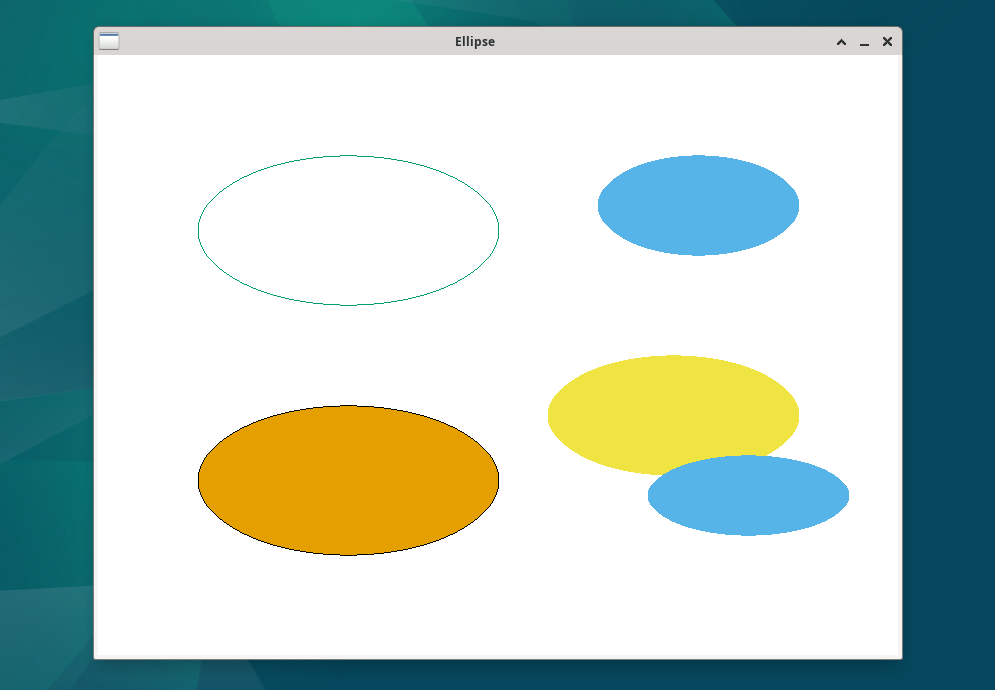
#include <splashkit.h>

#define DELAY 2000

int main(void) {
    open_window("Ellipse", 800, 600);

    color black        = rgb_color(  0,   0,   0);
    color bluish_green = rgb_color(  0, 158, 115);
    color sky_blue     = rgb_color( 86, 180, 233);
    color orange       = rgb_color(230, 159,   0);
    color yellow       = rgb_color(240, 228,  66);

    // draw the outline of an ellipse at the top-left
    // (x,y) position of top-left corner: (100, 100)
    // width: 300 pixels
    // height: 150 pixels
    draw_ellipse(bluish_green, 100, 100, 300, 150);
    refresh_screen();
    delay(DELAY);

    // fill an ellipse at the top-right
    // (x,y) position of top-left corner: (500, 100)
    // width: 200 pixels
    // height: 100 pixels
    fill_ellipse(sky_blue, 500, 100, 200, 100);
    refresh_screen();
    delay(DELAY);

    // draw an ellipse at the bottom-left
    fill_ellipse(orange, 100, 350, 300, 150);
    // add a border around the previous rectangle
    draw_ellipse(black, 100, 350, 300, 150);
    refresh_screen();
    delay(DELAY);

    // fill two overlapping ellipses at the bottom-right
    fill_ellipse(yellow, 450, 300, 250, 120);
    fill_ellipse(sky_blue, 550, 400, 200,  80);
    refresh_screen();
    delay(DELAY);

    delay(60000);
    close_all_windows();
    return 0;
}
This program:
- Opens a window with a default (white) background.
- Declares and initialises colours from the Okabe-Ito palette.
- Draws the outline of an ellipse at the top‑left with
draw_ellipse(). - Fills an ellipse at the top‑right with
fill_ellipse(). - Draws an ellipse (with a border) at the bottom‑left.
- Fills two overlapping ellipses at the bottom‑right.
- Pauses for 60 seconds.
- Closes the window and exits.
Triangles
And in case you need to draw triangles, SplashKit offers two functions to do this:
void draw_triangle(color clr, double x1, double y1, double x2, double y2, double x3, double y3);
void fill_triangle(color clr, double x1, double y1, double x2, double y2, double x3, double y3);
Both triangle-drawing functions require coordinates for the three corners of the triangle:
(x1, y1),(x2, y2), and(x3, y3)are the coordinates for the triangle's three vertices (corners).- The difference between the two functions is, as before:
draw_triangle()draws only the outline/border of a triangle.fill_triangle()fills-in the entire area within a triangle.
The following example shows how these functions can be used:
fill_triangle(sky_blue, 2, 2, 2, 9, 7, 6);
draw_triangle(orange, 9, 2, 14, 4, 12, 9);
refresh_screen();
In this snippet:
- A filled sky-blue triangle is drawn with vertices
(2, 2),(2, 9), and(7, 6). - The outline of an orange triangle is drawn with vertices
(9, 2),(14, 4), and(12, 9).
To see how draw_triangle() and fill_triangle() are used, run this program in your playground.c file.
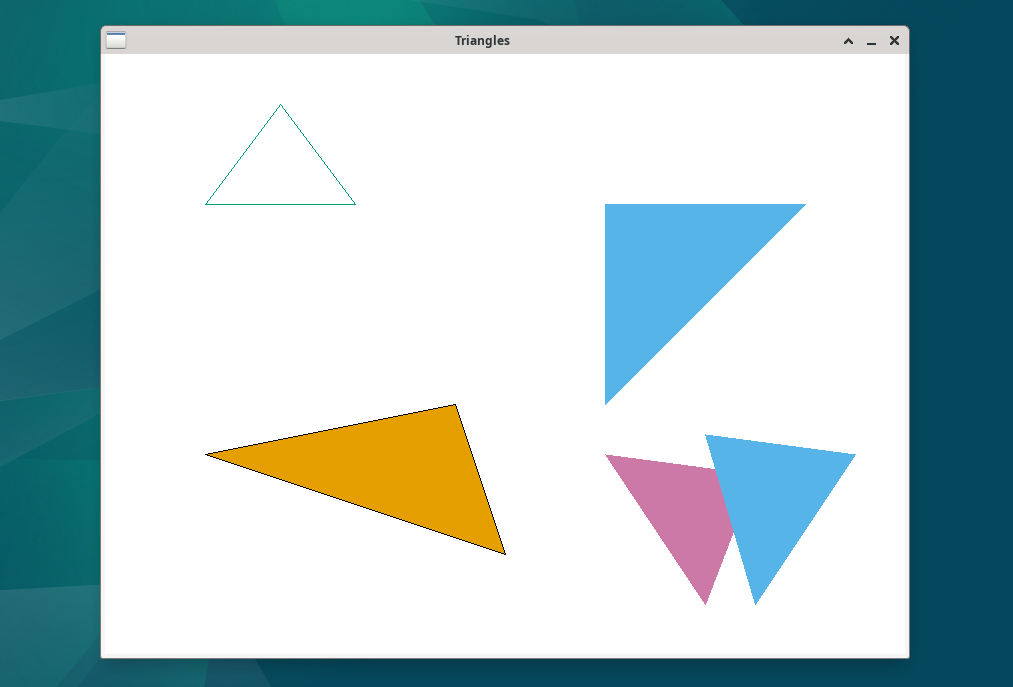
#include <splashkit.h>

#define DELAY 2000

int main(void) {
    open_window("Triangles", 800, 600);

    color black          = rgb_color(  0,   0,   0);
    color bluish_green   = rgb_color(  0, 158, 115);
    color sky_blue       = rgb_color( 86, 180, 233);
    color orange         = rgb_color(230, 159,   0);
    color reddish_purple = rgb_color(204, 121, 167);

    // draw the outline of an equilateral triangle at the top-left
    draw_triangle(bluish_green,
                  100, 150,
                  175,  50,
                  250, 150);
    refresh_screen();
    delay(DELAY);

    // fill a right-angled triangle at the upper-right
    fill_triangle(sky_blue,
                  500, 150,
                  700, 150,
                  500, 350);
    refresh_screen();
    delay(DELAY);

    // draw an obtuse triangle (with a border) at the bottom left
    fill_triangle(orange,
                  100, 400,
                  350, 350,
                  400, 500);
    draw_triangle(black,
                  100, 400,
                  350, 350,
                  400, 500);
    refresh_screen();
    delay(DELAY);

    // fill two overlapping triangles at the bottom-right
    fill_triangle(reddish_purple,
                  500, 400,
                  600, 550,
                  650, 420);
    fill_triangle(sky_blue,
                  600, 380,
                  750, 400,
                  650, 550);
    refresh_screen();
    delay(DELAY);

    delay(60000);
    close_all_windows();
    return 0;
}
This program:
- Opens a window with a default (white) background.
- Declares and initialises colours from the Okabe-Ito palette.
- Draws the outline of an equilateral triangle at the top‑left with
draw_triangle(). - Fills a right‑angled triangle at the upper‑right with
fill_triangle(). - Draws an obtuse triangle (with a border) at the bottom‑left (using
fill_triangle()thendraw_triangle()). - Fill two overlapping triangles at the bottom‑right with
fill_triangle()andfill_triangle(). - Pauses for 60 seconds.
- Closes the window and exits.
Transparent Shapes
Up until now, we've used rgb_color() to define colours by mixing red, green, and blue. These colours are "opaque", meaning that shapes drawn on top will completely hide anything beneath them.
SplashKit provides another function that allows you to define colours with transparency:
color rgba_color(int red, int green, int blue, int alpha);
- The parameters
red,green, andbluebehave the same as withrgb_color(), ranging from 0 (no colour) to 255 (maximum intensity). - The
alphaparameter controls transparency:- 0 means "fully transparent". Shapes drawn with this colour will be completely invisible.
- 255 means "fully opaque". Shapes drawn with this colour will be solid and not see-through at all.
- Values between 0 and 255 represent varying degrees of transparency.
This example demonstrates how transparent colours are used to draw overlapping shapes:
fill_rectangle(sky_blue, 2, 2, 8, 6);
color transparent_orange = rgba_color(230, 159, 0, 128);
fill_rectangle(transparent_orange, 6, 4, 8, 6);
refresh_screen();
In this snippet:
- A sky-blue rectangle is drawn.
- A transparent orange colour is defined with an
alphavalue of 128. Thisalphavalue is halfway between 0 and 255, representing a transparency of 50%. - A second rectangle using this transparent orange colour is drawn, partially overlapping the first rectangle. Due to the transparency of the second rectangle, the overlapped section of the first rectangle remains partially visible.
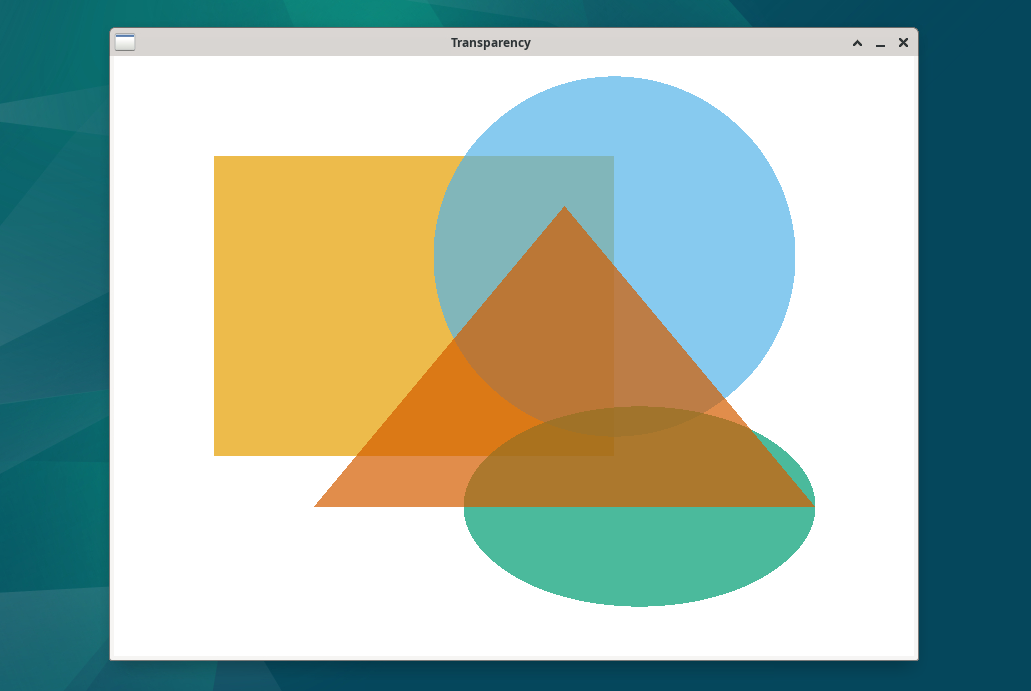
To see how rgba_color() can create transparent shapes, test this program in your playground.c file.
What does the program do if the alpha values in rgba_color() are changed from 180 to 255? Try it and see!
#include <splashkit.h>

#define DELAY 2000

int main(void) {
    open_window("Transparency", 800, 600);

    // declare semi‑transparent colours
    // each of these colours has an "alpha" opacity value of 180/255
    color transparent_orange       = rgba_color(230, 159,   0, 180);
    color transparent_sky_blue     = rgba_color( 86, 180, 233, 180);
    color transparent_bluish_green = rgba_color(  0, 158, 115, 180);
    color transparent_vermilion    = rgba_color(213,  94,   0, 180);

    // fill a rectangle
    fill_rectangle(transparent_orange, 100, 100, 400, 300);
    refresh_screen();
    delay(DELAY);

    // fill a transparent circle overlapping the rectangle
    fill_circle(transparent_sky_blue, 500, 200, 180);
    refresh_screen();
    delay(DELAY);

    // fill a transparent ellipse overlapping the rectangle and circle
    fill_ellipse(transparent_bluish_green, 350, 350, 350, 200);
    refresh_screen();
    delay(DELAY);

    // fill a transparent triangle overlapping all shapes
    fill_triangle(transparent_vermilion, 200, 450, 450, 150, 700, 450);
    refresh_screen();
    delay(DELAY);

    delay(60000);
    close_all_windows();
    return 0;
}
This program:
- Opens a window with a default (white) background.
- Declare semi‑transparent colours using
rgba_color(). - Fills a transparent rectangle.
- Fills a transparent circle overlapping the rectangle.
- Fills a transparent ellipse overlapping the rectangle and the circle.
- Fills a transparent triangle overlapping all shapes.
- Pauses for 60 seconds.
- Closes the window and exits.
Activity 1 of 2
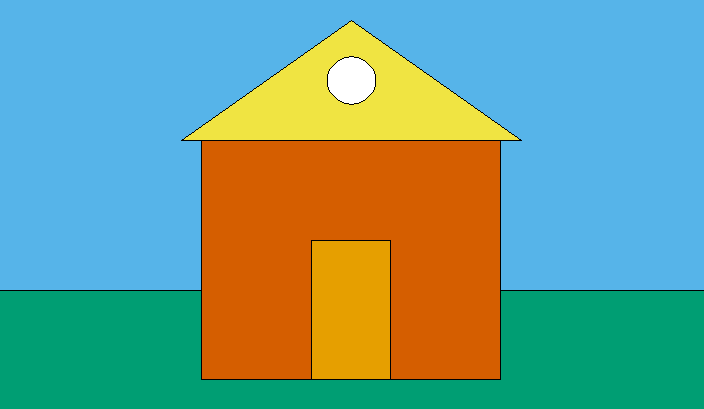
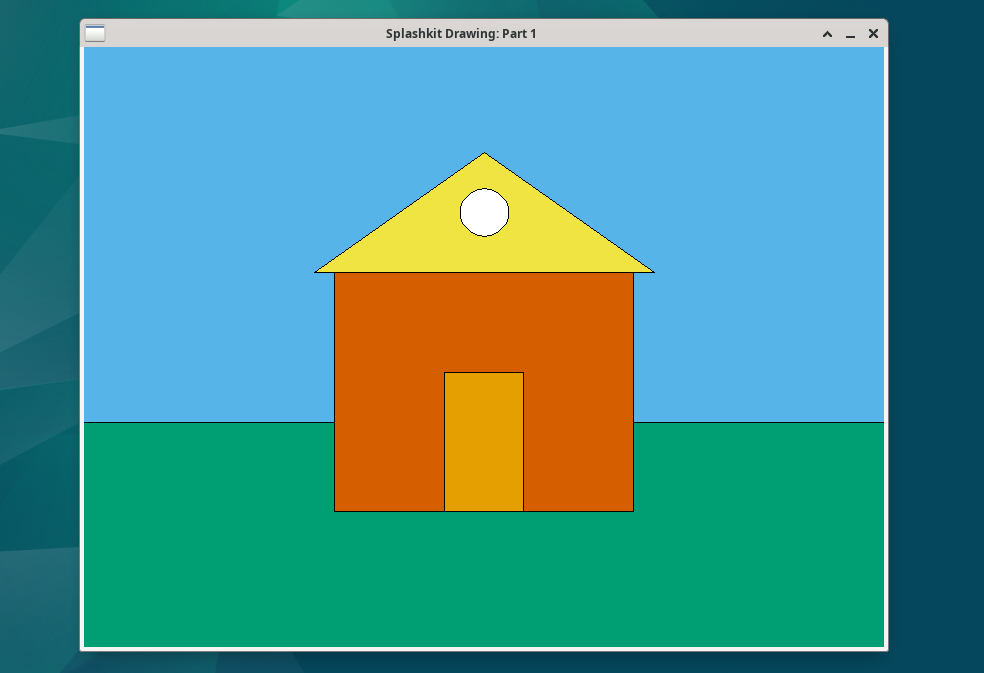
Create a program splashkit_drawing_part1.c. It should:
- Open a window 800 pixels wide and 600 pixels in height.
- Draw a simple house from basic shapes similar to the image below.
- Keep the window open for 10 seconds.
- Close the window and exit.
Examples
skm clang++ splashkit_drawing_part1.c -o splashkit_drawing_part1
./splashkit_drawing_part1
When the program runs, a window should appear, displaying a simple house for 10 seconds before closing.
Assumptions/Restrictions/Clarifications
- There are no autotests for this activity.
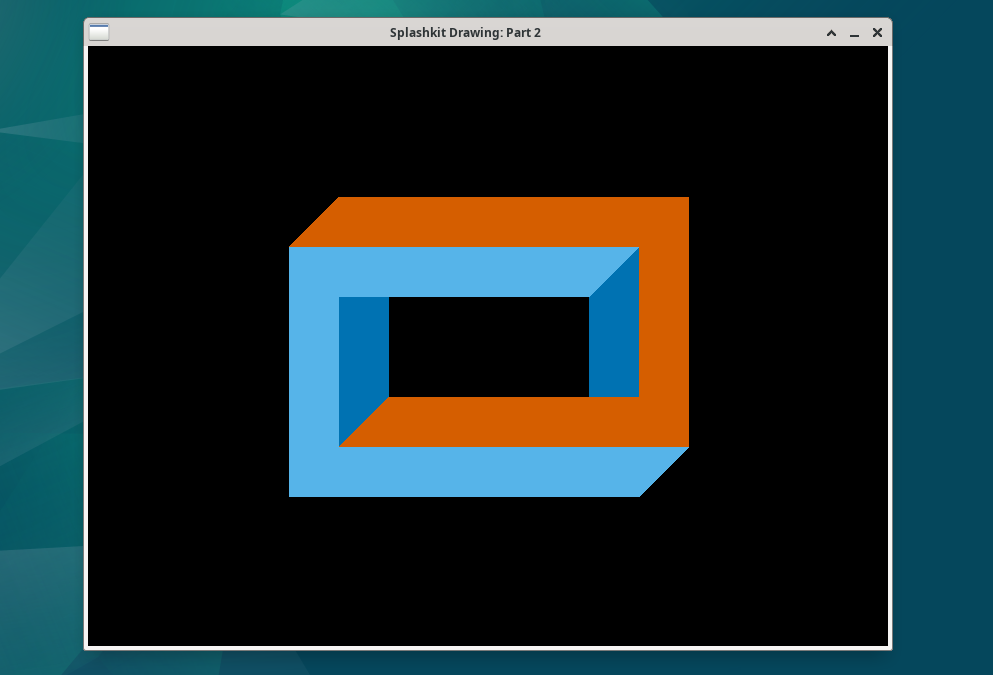
Activity 2 of 2:
Create a program splashkit_drawing_part2.c. It should:
- Open a window 800 pixels wide and 600 pixels in height.
- Draw the impossible object as shown below.
- Keep the window open for 10 seconds.
- Close the window and exit.

Examples
skm clang++ splashkit_drawing_part2.c -o splashkit_drawing_part2
./splashkit_drawing_part2
When the program runs, a window should appear, displaying the impossible object for 10 seconds before closing.
Assumptions/Restrictions/Clarifications
- There are no autotests for this activity.
Summary
In this activity, you learned how to work with functions to draw and fill shapes such as:
- Pixels.
- Lines.
- Rectangles.
- Circles.
- Ellipses.
- Triangles.
You also learned how to define transparent colours to draw see-through shapes.
Types and Functions
// Colours
color rgba_color(int red, int green, int blue, int alpha);

// Drawing
void draw_pixel(color clr, double x, double y);
void draw_line(color clr, double x1, double y1, double x2, double y2);
drawing_options option_line_width(int width);
void draw_line(color clr, double x1, double y1, double x2, double y2, drawing_options opts);
void draw_rectangle(color clr, double x, double y, double width, double height);
void fill_rectangle(color clr, double x, double y, double width, double height);
void draw_circle(color clr, double x, double y, double radius);
void fill_circle(color clr, double x, double y, double radius);
void draw_ellipse(color clr, double x, double y, double width, double height);
void fill_ellipse(color clr, double x, double y, double width, double height);
void draw_triangle(color clr, double x1, double y1, double x2, double y2, double x3, double y3);
void fill_triangle(color clr, double x1, double y1, double x2, double y2, double x3, double y3);
// Window Management
window open_window(string caption, int width, int height);
void close_all_windows(void);

// Program Control
void delay(int milliseconds);

// Screen Management
void clear_screen(color clr);
void refresh_screen(void);

// Colours
color rgb_color(int red, int green, int blue);
color rgba_color(int red, int green, int blue, int alpha);

// Okabe-Ito Accessible Colour Palette
color black          = rgb_color(  0,   0,   0);
color orange         = rgb_color(230, 159,   0);
color sky_blue       = rgb_color( 86, 180, 233);
color bluish_green   = rgb_color(  0, 158, 115);
color yellow         = rgb_color(240, 228,  66);
color blue           = rgb_color(  0, 114, 178);
color vermillion     = rgb_color(213,  94,   0);
color reddish_purple = rgb_color(204, 121, 167);

// Drawing
void draw_pixel(color clr, double x, double y);
void draw_line(color clr, double x1, double y1, double x2, double y2);
drawing_options option_line_width(int width);
void draw_line(color clr, double x1, double y1, double x2, double y2, drawing_options opts);
void draw_rectangle(color clr, double x, double y, double width, double height);
void fill_rectangle(color clr, double x, double y, double width, double height);
void draw_circle(color clr, double x, double y, double radius);
void fill_circle(color clr, double x, double y, double radius);
void draw_ellipse(color clr, double x, double y, double width, double height);
void fill_ellipse(color clr, double x, double y, double width, double height);
void draw_triangle(color clr, double x1, double y1, double x2, double y2, double x3, double y3);
void fill_triangle(color clr, double x1, double y1, double x2, double y2, double x3, double y3);